Evolution Technical Manual - Jemphrey
Evolution Technical Manual - Jemphrey
Evolution Technical Manual - Jemphrey

Create successful ePaper yourself
Turn your PDF publications into a flip-book with our unique Google optimized e-Paper software.
<strong>Technical</strong> <strong>Manual</strong><br />
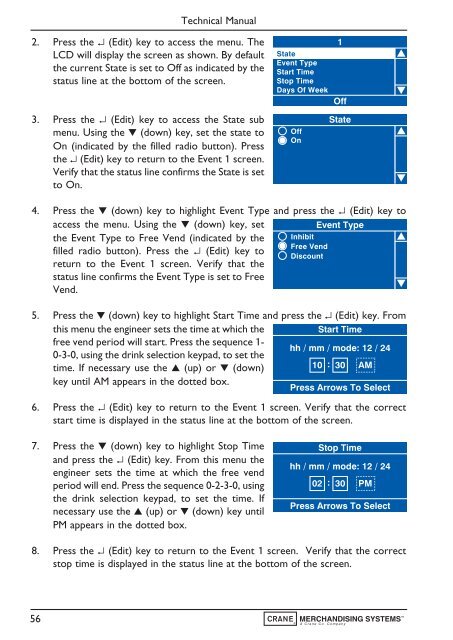
2. Press the ↵ (Edit) key to access the menu. The<br />
LCD will display the screen as shown. By default<br />
the current State is set to Off as indicated by the<br />
status line at the bottom of the screen.<br />
3. Press the ↵ (Edit) key to access the State sub<br />
menu. Using the ▼ (down) key, set the state to<br />
On (indicated by the filled radio button). Press<br />
the ↵ (Edit) key to return to the Event 1 screen.<br />
Verify that the status line confirms the State is set<br />
to On.<br />
State<br />
Event Type<br />
Start Time<br />
Stop Time<br />
Days Of Week<br />
Off<br />
On<br />
1<br />
Off<br />
State<br />
4. Press the ▼ (down) key to highlight Event Type and press the ↵ (Edit) key to<br />
access the menu. Using the ▼ (down) key, set<br />
Event Type<br />
the Event Type to Free Vend (indicated by the Inhibit<br />
Free Vend<br />
filled radio button). Press the ↵ (Edit) key to<br />
Discount<br />
return to the Event 1 screen. Verify that the<br />
status line confirms the Event Type is set to Free<br />
Vend.<br />
5. Press the ▼ (down) key to highlight Start Time and press the ↵ (Edit) key. From<br />
this menu the engineer sets the time at which the<br />
free vend period will start. Press the sequence 1-<br />
0-3-0, using the drink selection keypad, to set the<br />
Start Time<br />
hh / mm / mode: 12 / 24<br />
time. If necessary use the ▲ (up) or ▼ (down)<br />
10 : 30 AM<br />
key until AM appears in the dotted box.<br />
Press Arrows To Select<br />
6. Press the ↵ (Edit) key to return to the Event 1 screen. Verify that the correct<br />
start time is displayed in the status line at the bottom of the screen.<br />
7. Press the ▼ (down) key to highlight Stop Time<br />
and press the ↵ (Edit) key. From this menu the<br />
engineer sets the time at which the free vend<br />
period will end. Press the sequence 0-2-3-0, using<br />
the drink selection keypad, to set the time. If<br />
necessary use the ▲ (up) or ▼ (down) key until<br />
PM appears in the dotted box.<br />
Stop Time<br />
hh / mm / mode: 12 / 24<br />
02 : 30 PM<br />
Press Arrows To Select<br />
8. Press the ↵ (Edit) key to return to the Event 1 screen. Verify that the correct<br />
stop time is displayed in the status line at the bottom of the screen.<br />
56