You also want an ePaper? Increase the reach of your titles
YUMPU automatically turns print PDFs into web optimized ePapers that Google loves.
<strong>Grundfos</strong> E-<strong>pumps</strong><br />
3<br />
Flow limit for the stop function<br />
(only three-phase <strong>pumps</strong>)<br />
Note: Flow limit for the stop function only works if the<br />
system is not set up for flow switch.<br />
bar, mbar, m, kPa, psi, ft, m 3 /h, m 3 /s, l/s, gpm, °C,<br />
°F, %<br />
• Sensor measuring range.<br />
Duty/standby (only three-phase <strong>pumps</strong>)<br />
The duty/standby function applies to two <strong>pumps</strong> connected<br />
in parallel and controlled via GENIbus.<br />
E-<strong>pumps</strong><br />
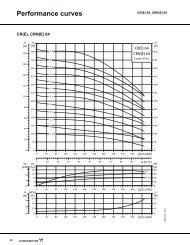
In order to set at which flow rate the system is to go<br />
from continuous operation at constant pressure to<br />
start/stop operation, select among these four values of<br />
which three are pre-configured flow limits:<br />
• Low<br />
• Normal<br />
• High<br />
• Custom.<br />
The default setting of the pump is "Normal", representing<br />
approx. 10 % of the pump rated flow.<br />
If a lower flow limit than "Normal" is desired or the tank<br />
size is smaller than recommended, select "Low".<br />
If a higher flow than "Normal" is desired or a large tank<br />
is used, select "High".<br />
The value "Custom" can be seen in the R100, but it<br />
can only be set via the PC Tool E-products. "Custom"<br />
is for customized setup and optimizing to the process.<br />
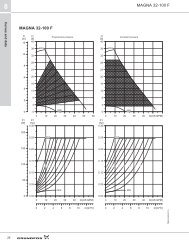
Fig. 36 Three pre-configured flow limits, "Low", "Normal"<br />
and "High"<br />
Sensor<br />
Low<br />
∆H<br />
Normal<br />
Without sensor<br />
(Uncontrolled)<br />
High<br />
With pressure sensor<br />
(Controlled)<br />
The setting of the sensor is only relevant in the case of<br />
controlled operation.<br />
Select among the following values:<br />
• Sensor output signal<br />
0-10 V<br />
0-20 mA<br />
4-20 mA<br />
• Unit of measurement of sensor:<br />
TM03 9060 3307<br />
The duty/standby function can be set to these values:<br />
• Active<br />
• Not active.<br />
When the function is set to "Active", the following<br />
applies:<br />
• Only one pump is running at a time.<br />
• The stopped pump (standby) will automatically be<br />
cut in if the running pump (duty) has a fault. A fault<br />
will be indicated.<br />
• Changeover between the duty pump and the<br />
standby pump will take place every 24 hours.<br />
Activate the duty/standby function as follows:<br />
1. Install and prime the two <strong>pumps</strong> per the installation<br />
and operating instructions included with the <strong>pumps</strong>.<br />
2. Verify the power supply is connected to the first<br />
pump per the installation and operating instructions.<br />
3. Use the <strong>Grundfos</strong> R100 programmer to set the<br />
duty/standby to "not active" in the installation menu.<br />
4. Use the <strong>Grundfos</strong> R100 programmer to set the<br />
"operating mode" to "stop" in the operation menu.<br />
5. Use the <strong>Grundfos</strong> R100 programmer to set the other<br />
displays as required for the pump application (such<br />
as setpoint).<br />
6. Disconnect the power supply to both <strong>pumps</strong>.<br />
7. Installation of the "AYB" cable (91125604):<br />
a. Remove the plug from each MLE casing with a<br />
flat head screw driver (see fig. 37).<br />
b. Thread a new cable gland into each MLE casing<br />
with a crescent wrench (see fig. 37).<br />
c. Loosen the new cable gland caps and push the<br />
cable ends through the cable glands and into MLE<br />
motors.<br />
d. Remove the "AYB" connector plug from the first<br />
MLE motor (see fig. 38).<br />
e. Connect the black wire to the "A" terminal of the<br />
"AYB" connector plug.<br />
f. Connect the orange wire to the "Y" terminal of the<br />
"AYB" connector plug.<br />
g. Connect the red wire to the "B" terminal of the<br />
"AYB" connector plug.<br />
h. Reconnect the "AYB" connector plug to the first<br />
MLE motor.<br />
i. Tighten the new cable gland cap to secure the<br />
cable (see fig. 37).<br />
j. Repeat steps "d" through "i" for the second MLE<br />
motor.<br />
35