Ideal Esprit HE Combi Boilers 24,30,35 User Guide - BHL.co.uk
Ideal Esprit HE Combi Boilers 24,30,35 User Guide - BHL.co.uk
Ideal Esprit HE Combi Boilers 24,30,35 User Guide - BHL.co.uk

You also want an ePaper? Increase the reach of your titles
YUMPU automatically turns print PDFs into web optimized ePapers that Google loves.
INSTALLATION<br />
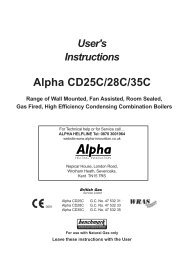
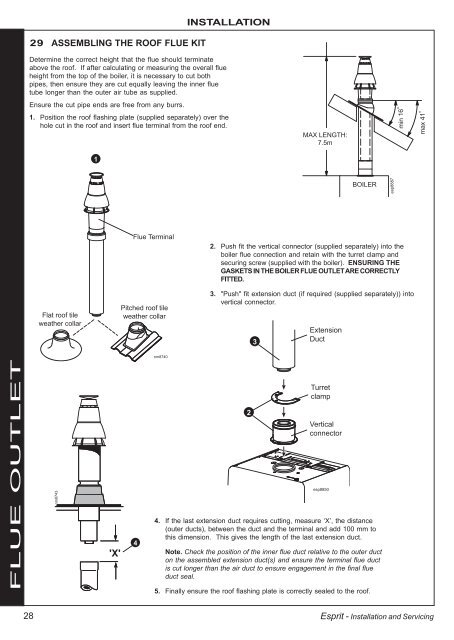
29 ASSEMBLING T<strong>HE</strong> ROOF FLUE KIT<br />
Determine the <strong>co</strong>rrect height that the flue should terminate<br />
above the roof. If after calculating or measuring the overall flue<br />
height from the top of the boiler, it is necessary to cut both<br />
pipes, then ensure they are cut equally leaving the inner flue<br />
tube longer than the outer air tube as supplied.<br />
Ensure the cut pipe ends are free from any burrs.<br />
1. Position the roof flashing plate (supplied separately) over the<br />
hole cut in the roof and insert flue terminal from the roof end.<br />
MAX LENGTH:<br />
7.5m<br />
min 16 o<br />
max 41 o<br />
1<br />
BOILER<br />
esp8887<br />
Flat roof tile<br />
weather <strong>co</strong>llar<br />
Flue Terminal<br />
Pitched roof tile<br />
weather <strong>co</strong>llar<br />
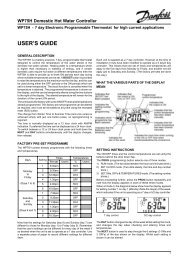
2. Push fit the vertical <strong>co</strong>nnector (supplied separately) into the<br />
boiler flue <strong>co</strong>nnection and retain with the turret clamp and<br />
securing screw (supplied with the boiler). ENSURING T<strong>HE</strong><br />
GASKETS IN T<strong>HE</strong> BOILER FLUE OUTLET ARE CORRECTLY<br />
FITTED.<br />
3. "Push" fit extension duct (if required (supplied separately)) into<br />
vertical <strong>co</strong>nnector.<br />
3<br />
Extension<br />
Duct<br />
nm8740<br />
FLUE OUTLET<br />
nm8743<br />
'X'<br />
4<br />
2<br />
Turret<br />
clamp<br />
Vertical<br />
<strong>co</strong>nnector<br />
esp8850<br />
4. If the last extension duct requires cutting, measure ‘X’, the distance<br />
(outer ducts), between the duct and the terminal and add 100 mm to<br />
this dimension. This gives the length of the last extension duct.<br />
Note. Check the position of the inner flue duct relative to the outer duct<br />
on the assembled extension duct(s) and ensure the terminal flue duct<br />
is cut longer than the air duct to ensure engagement in the final flue<br />
duct seal.<br />
5. Finally ensure the roof flashing plate is <strong>co</strong>rrectly sealed to the roof.<br />
28<br />
<strong>Esprit</strong> - Installation and Servicing