Ideal Esprit HE Combi Boilers 24,30,35 User Guide - BHL.co.uk
Ideal Esprit HE Combi Boilers 24,30,35 User Guide - BHL.co.uk
Ideal Esprit HE Combi Boilers 24,30,35 User Guide - BHL.co.uk

You also want an ePaper? Increase the reach of your titles
YUMPU automatically turns print PDFs into web optimized ePapers that Google loves.
SERVICING<br />
SERVICING<br />
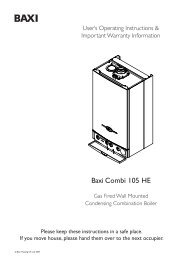
80 <strong>HE</strong>AT ENGINE REPLACEMENT<br />
Refer also to Frame 8 - 'Boiler Exploded View'.<br />
IMPORTANT<br />
Before starting the removal procedure, protect the gas and<br />
electrical <strong>co</strong>ntrols with a waterproof sheet or plastic bag.<br />
1. Refer to Frame 52.<br />
2. Drain the boiler. Refer to Frame 72.<br />
3. Swing the <strong>co</strong>ntrol box down into the servicing position.<br />
Refer to Frame 46.<br />
4. Remove the fan / venturi assembly and place on one<br />
side. Refer to Frame 47.<br />
5. Remove the burner and place on one side. Refer to<br />
Frame 56.<br />
6. Remove the ignition and detection electrodes. Refer to<br />
Frames 58 & 59.<br />
7. Remove the spark generator. Refer to Frame 60.<br />
8. Release the flue from the turret. Refer to Frame <strong>24</strong>.<br />
9. Remove the turret from the boiler. Refer to Frame <strong>24</strong>.<br />
10. Release the sili<strong>co</strong>ne tubing from the sampling point.<br />
11. Release the electrical <strong>co</strong>nnection to the dry fire<br />
thermistor.<br />
12. Remove the M5 x 10 screw retaining the top flue manifold<br />
casting.<br />
13. Remove the top casting of the flue manifold from the<br />
appliance.<br />
14. Remove the automatic air vent. Refer to Frame 71.<br />
15. Undo the M5 x 12 screws securing the bottom flue<br />
manifold casting and remove.<br />
16. Remove the M5 screw and remove the return pipe<br />
securing bracket by sliding forwards.<br />
17. Remove the overheat thermostat and the <strong>co</strong>ntrol<br />
thermistor. Refer to Frame 57.<br />
18. Unscrew the brass union <strong>co</strong>nnection to release the flow<br />
pipe.<br />
19. Remove the <strong>co</strong>ndensate trap/ siphon. Refer to Frame 64.<br />
20. Loosen the 2 bottom M5 screws securing the inter panel to<br />
the back panel and remove the 2 upper M5 screws.<br />
21. Slide the heat exchanger and inter panel assembly<br />
upward to disengage and remove from the casing,<br />
<strong>co</strong>mplete with the flow pipe.<br />
22. Remove the 2 M6 <strong>co</strong>untersunk screws, remove the inter<br />
panel and transfer to the new heat exchanger.<br />
23. Remove the M5 screw and remove the flow pipe securing<br />
bracket.<br />
<strong>24</strong>. Remove the flow pipe and transfer to the new heat<br />
exchanger.<br />
25. Reassemble in reverse order, replacing gaskets or seals<br />
if any sign of damage or deterioration is evident.<br />
Note.The heat exchanger is supplied with new <strong>co</strong>mbustion<br />
chamber insulation boards. These should be fitted (refer<br />
to Frame 63 before the burner and fan / venturi<br />
assembly and before the ignition and detection<br />
electrodes are replaced).<br />
26. Refill the boiler. Refer to Frame 32.<br />
27. Check operation of the boiler. Refer to Frame 52.<br />
12 10<br />
20<br />
11 14<br />
18<br />
15<br />
15<br />
16<br />
22<br />
23<br />
esp8869<br />
56<br />
<strong>Esprit</strong> - Installation and Servicing