Diskeeper 10 User's Manual
Diskeeper 10 User's Manual
Diskeeper 10 User's Manual

You also want an ePaper? Increase the reach of your titles
YUMPU automatically turns print PDFs into web optimized ePapers that Google loves.
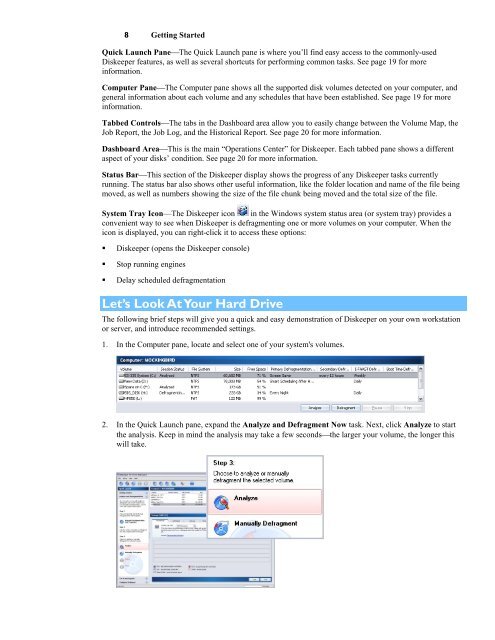
8 Getting Started<br />
Quick Launch Pane⎯The Quick Launch pane is where you’ll find easy access to the commonly-used<br />
<strong>Diskeeper</strong> features, as well as several shortcuts for performing common tasks. See page 19 for more<br />
information.<br />
Computer Pane⎯The Computer pane shows all the supported disk volumes detected on your computer, and<br />
general information about each volume and any schedules that have been established. See page 19 for more<br />
information.<br />
Tabbed Controls⎯The tabs in the Dashboard area allow you to easily change between the Volume Map, the<br />
Job Report, the Job Log, and the Historical Report. See page 20 for more information.<br />
Dashboard Area⎯This is the main “Operations Center” for <strong>Diskeeper</strong>. Each tabbed pane shows a different<br />
aspect of your disks’ condition. See page 20 for more information.<br />
Status Bar⎯This section of the <strong>Diskeeper</strong> display shows the progress of any <strong>Diskeeper</strong> tasks currently<br />
running. The status bar also shows other useful information, like the folder location and name of the file being<br />
moved, as well as numbers showing the size of the file chunk being moved and the total size of the file.<br />
System Tray Icon—The <strong>Diskeeper</strong> icon in the Windows system status area (or system tray) provides a<br />
convenient way to see when <strong>Diskeeper</strong> is defragmenting one or more volumes on your computer. When the<br />
icon is displayed, you can right-click it to access these options:<br />
• <strong>Diskeeper</strong> (opens the <strong>Diskeeper</strong> console)<br />
• Stop running engines<br />
• Delay scheduled defragmentation<br />
Let’s Look At Your Hard Drive<br />
The following brief steps will give you a quick and easy demonstration of <strong>Diskeeper</strong> on your own workstation<br />
or server, and introduce recommended settings.<br />
1. In the Computer pane, locate and select one of your system's volumes.<br />
2. In the Quick Launch pane, expand the Analyze and Defragment Now task. Next, click Analyze to start<br />
the analysis. Keep in mind the analysis may take a few seconds⎯the larger your volume, the longer this<br />
will take.