GA-EX58-UD3R - Hardware
GA-EX58-UD3R - Hardware
GA-EX58-UD3R - Hardware

You also want an ePaper? Increase the reach of your titles
YUMPU automatically turns print PDFs into web optimized ePapers that Google loves.
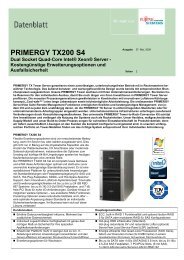
Performing the Rebuild in the Operating System<br />
While in the operating system, make sure the chipset driver has been installed from the motherboard<br />
driver disk. Then launch the Intel ® Matrix Storage Console from All Programs in the Start menu.<br />
Step 1:<br />
On the View menu of the Intel Matrix Storage<br />
Console, select Advanced Mode for a more<br />
detailed view of the storage device information.<br />
Step 2:<br />
The new hard drive appears under Non-RAID<br />
Hard Drive. Right-click on the new hard drive<br />
and select Rebuild to this Hard Drive.<br />
Step 3:<br />
Click Next when the Rebuild RAID Volume<br />
Wizard appears. Follow the on-screen instructions<br />
to proceed.<br />
Step 4:<br />
To check the rebuild status during the rebuild<br />
process, right-click on the rebuild volume and<br />
select Show Rebuild Progress.<br />
Step 5:<br />
When the message "The rebuild was completed<br />
successfully," appears, click OK to complete.<br />
Step 6:<br />
After the RAID 1 volume rebuilding, click the<br />
volume and its status in the information pane<br />
will display as Normal.<br />
- 97 -<br />
Appendix