Girard Systems- Warranty and Freight Procedures
Girard Systems- Warranty and Freight Procedures
Girard Systems- Warranty and Freight Procedures

Create successful ePaper yourself
Turn your PDF publications into a flip-book with our unique Google optimized e-Paper software.
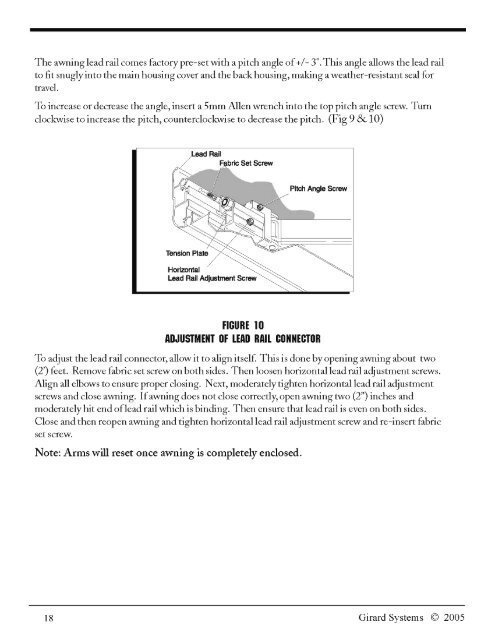
The awning lead rail comes factory pre-set with a pitch angle of+/- 3°. This angle allows the lead rail<br />
to fit snuglyinto the main housing cover <strong>and</strong> the back housing, making a weather-resistant seal for<br />
travel.<br />
To increase or decrease the angle, insert a 5mm Allen wrench into the top pitch angle screw. Turn<br />
clockwise to increase the pitch, counterclockwise to decrease the pitch. (Fig 9 & 10)<br />
Lead Rail<br />
Fabric Set Screw<br />
Pitch Angle Screw<br />
Horizontal<br />
Lead Rail Adjustment Screw<br />
FIGURE 10<br />
ADJUSTMENT OF LEAD RAIL CONNECTOR<br />
To adjust the lead rail connector, allow itto align itself. This is done byopening awning about two<br />
(2') feet. Remove fabric set screw on both sides. Then loosen horizontal lead rail adjustment screws.<br />
Align all elbows to ensure proper closing. Next, moderatelytighten hori=ntallead rail adjustment<br />
screws <strong>and</strong> close awning. Ifawning does not close correctly, open awning two (2") inches <strong>and</strong><br />
moderately hit end oflead rail which is binding. Then ensure that lead rail is even on both sides.<br />
Close <strong>and</strong> then reopen awning <strong>and</strong> tighten hori=ntallead rail adjustment screw <strong>and</strong> re-insert fabric<br />
set screw.<br />
Note: Arms will reset once awning is completely enclosed.<br />
18 <strong>Girard</strong> <strong>Systems</strong> © 2005