Girard Systems- Warranty and Freight Procedures
Girard Systems- Warranty and Freight Procedures
Girard Systems- Warranty and Freight Procedures

Create successful ePaper yourself
Turn your PDF publications into a flip-book with our unique Google optimized e-Paper software.
--------------- GIRARD<br />
SYSTEMs"<br />
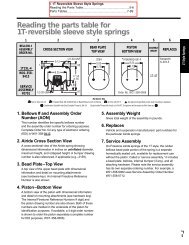
5) Remove the right h<strong>and</strong>/front awning end plate byremoving the (3) Phillips screw, which<br />
secure it to the awning casing.(Figure 12)<br />
6) Remove both motor bolts (Figure 13,) which fasten the motorto the motor end bracket<br />
Take note <strong>and</strong> markthe slots from which the boltwere removed.<br />
7) Loosen the small bolt bya couple ofturns, which secures the motor end bracket to its<br />
holding bracket. Do not over-loosen or attempt to remove this bolt. Slide the motor end<br />
bracket away from its holding bracket <strong>and</strong> remove.<br />
8) Enter into the vehicle, <strong>and</strong>locate the termination point ofthe motor cord. This pointwill<br />
be either inside junction box used for the awning switch, orwill be inside the electronic<br />
box. Either can probablybe found inside ofan upper cabinet. The motor cord ca be<br />
identified as the WHITE cord bearing (4) wires. Take note ofthe point's from which<br />
each motor wire disconnects. See also wiring diagram. Disconnect complete motor cord.<br />
9) Tape a long 'pig tale' extension to the motor cord (using string, rope, small wire, etc.) such<br />
thatwhen the cordis pulledthrough, its routing is not lost. Exit vehicle <strong>and</strong> pull motor<br />
cord completelythrough wall.<br />
10) Carefullypull old motor out ofawning roller tube. (Figure 13) Pull motor cord out ofhole<br />
in backofawning casing, <strong>and</strong> disconnect motor cord form the 'pig tail'.<br />
11) Locate the roller tube.<br />
After Removal of<br />
(3)Screw For End Plate<br />
(2) Bolt For Motor Mount<br />
Roller Support Bracket<br />
Sl1de Motor set out to the rIght<br />
Remove<br />
Bolt For Motor Moum<br />
Rom....<br />
Roller Tube Support Bracket<br />
r.,,~<br />
l.a:~~<br />
~ "''''''~ '<br />
Motor Sst<br />
. ,<br />
Some piscss not shawn for clarity<br />
Roller Tube<br />
"-,,- Roller Tube<br />
"'-.....j Support Bracket<br />
Bolt Foe<br />
Motor Mount<br />
Tube Support Bracket<br />
(DO NaT REMOVE)<br />
~<br />
'_'-'<br />
'":C'<br />
.(;GlldlngAngle<br />
.... " At Motor<br />
Screw For<br />
Main Housing<br />
End Plate<br />
'1"<br />
d Plate<br />
FIGURE 12<br />
END PLATE REMOVAL<br />
FIGURE 13<br />
REMOVING OLD MOTOR<br />
Section IIa Removing the old motor ifthe awning cannot be opened <strong>and</strong> has no manual<br />
override.<br />
Note: (3) people <strong>and</strong> (3) ladders will be required to perform the first portion ofthis procedure.<br />
1) remove the right h<strong>and</strong>/front awning endplate <strong>and</strong>lead rail end plate byremoving the (5)<br />
Phillips screws, which secure them to the awning casing.<br />
<strong>Girard</strong> <strong>Systems</strong> © 2005 21