Girard Systems- Warranty and Freight Procedures
Girard Systems- Warranty and Freight Procedures
Girard Systems- Warranty and Freight Procedures

Create successful ePaper yourself
Turn your PDF publications into a flip-book with our unique Google optimized e-Paper software.
SECTION I ACCESSING THE MOTOR<br />
Beavermotorcoaches: Awning is recessed into vehicle sidewall. Awning end plate is not<br />
immediatelyaccessible:<br />
1) Locate the awning mounting bolts. There will be (3) sets of(6) ofthese, which secure the<br />
awning brackets, through to the inside ofthe vehicle. Theyare usually found inside the<br />
upper cabinets <strong>and</strong> are located directly behindthe connection point ofthe awning arms.<br />
Onlythe forward set ofbolts needto be accessed.<br />
2) Loosen each bolt from the inside byremoving each respective nut. Loosen the nuts only<br />
from the forward mounting bracket.<br />
3) Using a sharp utility knife, <strong>and</strong> from outside to the vehicle, cut away 3 feet ofthe Silicon<br />
adhesive around the top, side, <strong>and</strong> bottom edges ofthe awning casing. Do this from the front<br />
ofthe awning only.<br />
4) Carefullypull the right front section ofthe awning casing away from the vehicle to point<br />
where the entire awning end cap is accessible. Do this byeither extending the awning all the<br />
way, <strong>and</strong> pulling down gentlyon the lead rail, this will pryawning out ofthe wall. Place a<br />
solid object (large flat screw driver, flat file, etc.) behind the awning casing, in front ofthe<br />
recess area, to holdthe awning away.<br />
5) Proceedwith section II, removing the old motor.<br />
Safari motor coaches: Awning is recessed into vehicle sidewall. Awning endplate is accessible<br />
through a hidden recess.<br />
1) Locate the 2"x8" plate mounted over hidden recess directlypastthe front/right h<strong>and</strong> edge of<br />
the awning. Remove the plate bydrilling outthe (3) pop rivets that secure itto the vehicle<br />
sidewall.<br />
2) Proceed with Section II, Removingthe OldMotor.<br />
Surface mount installations (all othermanufactures): Awning is NOT recessed into vehicle<br />
sidewall. Awning endplate is easily accessible. SectionII. Removingthe OldMotor.<br />
1) Open the awning about 3 ft. Ifthe awning is not equippedwith a manual crank override<br />
<strong>and</strong> the awning cannot be opened, please see paragraph III below.<br />
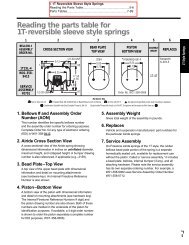
2) Before replacing the motor, open the awning partially<strong>and</strong>put a mark on fabric guide #4<br />
(refer to diagram on page 62) on the motor side, indication the endofthe roller tube. This<br />
guide will have to be short endto the same length as the roller tube to fit the new motor.<br />
This can be done with a pair oftin snips.<br />
3) Fullyextend awning bymanuallycranking the awning out until the fabric starts to sag. With<br />
the awning fully extended have another person pull down on the lead rail slightly until you<br />
are able to put something behind the awning to holdit offthe wall. Make sure there are no<br />
nuts on the 6 bolts that hold the awning to the wall.<br />
4) Tape or strap each arm, about 1 ft.in from the 'elbow', such thatthe arms are lockedinto<br />
their position. These arms must be securely fixed against their own spring tension, such that<br />
the awning is prevented from opening further when the motor is removed. "Use this method<br />
ifawning can not be fully extended".<br />
20 <strong>Girard</strong> <strong>Systems</strong> © 2005