Girard Systems- Warranty and Freight Procedures
Girard Systems- Warranty and Freight Procedures
Girard Systems- Warranty and Freight Procedures

Create successful ePaper yourself
Turn your PDF publications into a flip-book with our unique Google optimized e-Paper software.
I. FABRIC REPLACEMENT<br />
RECESSED AWNINGS:<br />
This fabric changing procedure is recommended for use on G-2000 Awnings in which the<br />
awning has been 'recessed' into the vehicle sidewall. This is typical with both'Beaver' <strong>and</strong>'Safari'<br />
Motor Coach installations. Ifthe awning has not been recessed <strong>and</strong> has been 'surface' or'flush'<br />
mounted onto the vehicle side, please see 'Fabric Replacement Method#2, Surface mounted<br />
awnings.' In either case, the old awning fabric can be removed without the need to remove the<br />
complete awning, or the awning roller tube. All awning hardware will remain in position.<br />
NOTE: this procedure requires the use ofthe awning manual crank. Ifno manual crankis<br />
available, the motor limit switches must be used to create the settings. Ifthis case, refer to<br />
'AdjustingMotor Limit Switches".<br />
REMOVING THE OLD FABRIC:<br />
1) Open the awning fully until the arms 'click'into place. Using the manual crank, (use the<br />
motor limit switches <strong>and</strong> adjust, ifno crankis available) continue to rotate the roller tube<br />
until all the fabric is unrolled <strong>and</strong>the 'C' groove ofthe roller tube is accessible.<br />
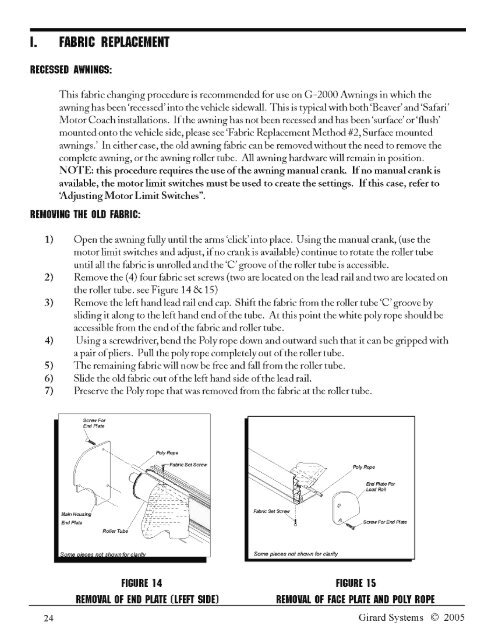
2) Remove the (4) four fabric set screws (two arelocatedon thelead rail <strong>and</strong>two arelocatedon<br />
the roller tube. see Figure 14 & 15)<br />
3) Remove the left h<strong>and</strong>lead rail end cap. Shiftthe fabric from the roller tube 'C' groove by<br />
sliding it along to the left h<strong>and</strong> endofthe tube. At this point the white poly rope should be<br />
accessible from the endofthe fabric <strong>and</strong> roller tube.<br />
4) Using a screwdriver, bend the Poly rope down <strong>and</strong> outward such that it can be gripped with<br />
a pair ofpliers. Pull the poly rope completely out ofthe roller tube.<br />
5) The remaining fabric will now be free <strong>and</strong> fall from the roller tube.<br />
6) Slide the old fabric out ofthe left h<strong>and</strong> side ofthe lead rail.<br />
7) Preserve the Poly rope thatwas removed from the fabric at the roller tube.<br />
Poly Rope<br />
Poly Rope<br />
Main Housing<br />
End Plate<br />
Roller Tube<br />
Fabric Set scr~:<br />
!<br />
Some pieces not shawn for clarity<br />
FIGURE 14<br />
REMOVAL OF END PLATE (LFEFT SIDE)<br />
FIGURE 15<br />
REMOVAL OF FACE PLATE AND POLY ROPE<br />
24<br />
<strong>Girard</strong> <strong>Systems</strong> © 2005