Girard Systems- Warranty and Freight Procedures
Girard Systems- Warranty and Freight Procedures
Girard Systems- Warranty and Freight Procedures

Create successful ePaper yourself
Turn your PDF publications into a flip-book with our unique Google optimized e-Paper software.
--------------- GIRARD<br />
SYSTEMs"<br />
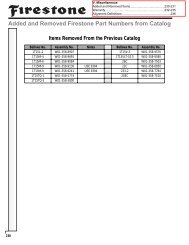
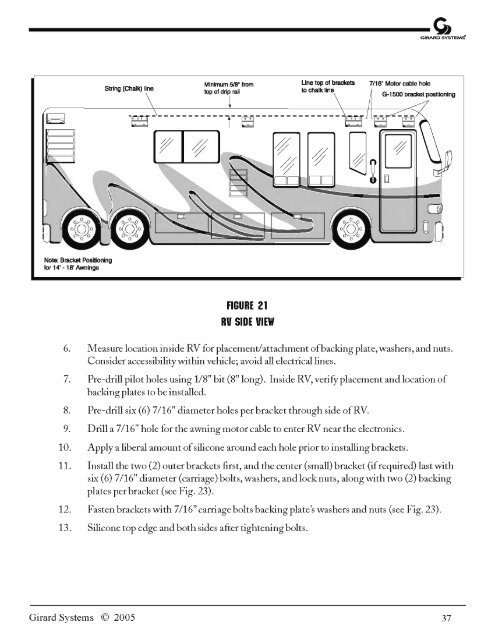
String (Chalk) Iino<br />
Minimum 5/8" from<br />
top of drip rail<br />
Uno top of brackets<br />
to chalk line<br />
7/16" Motor cable hole<br />
G-1500 bracket positioning<br />
-~------------l--~--------------<br />
[p I0/ ] 0/ 0/<br />
DD DD<br />
Note: Bracket Positioning<br />
for 14' -18' Awnings<br />
FIGURE 21<br />
RV SIDE VIEW<br />
6. Measure location inside RV for placement/attachment ofbacking plate,washers, <strong>and</strong> nuts.<br />
Consider accessibilitywithin vehicle; avoid all electrical lines.<br />
7. Pre-drill pilot holes using 1/8" bit (8" long). Inside RV, verifY placement <strong>and</strong>location of<br />
backing plates to be installed.<br />
8. Pre-drill six (6) 7/16" diameter holes per bracketthrough side ofRV.<br />
9. Drill a 7/16" hole for the awning motor cable to enter RV near the electronics.<br />
10. Apply a liberal amount ofsilicone around each hole prior to installing brackets.<br />
11. Install the two (2) outer brackets first, <strong>and</strong> the center (small) bracket (ifrequired) last with<br />
six (6) 7/16" diameter (carriage) bolts, washers, <strong>and</strong>lock nuts, along with two (2) backing<br />
plates perbracket (see Fig. 23).<br />
12. Fasten brackets with 7/16" carriage bolts backing plate's washers <strong>and</strong> nuts (see Fig. 23).<br />
13. Silicone top edge <strong>and</strong> both sides after tightening bolts.<br />
<strong>Girard</strong> <strong>Systems</strong> © 2005 37