

Installation & Setup User Guide - Best Access Systems
Installation & Setup User Guide - Best Access Systems
Installation & Setup User Guide - Best Access Systems

You also want an ePaper? Increase the reach of your titles
YUMPU automatically turns print PDFs into web optimized ePapers that Google loves.
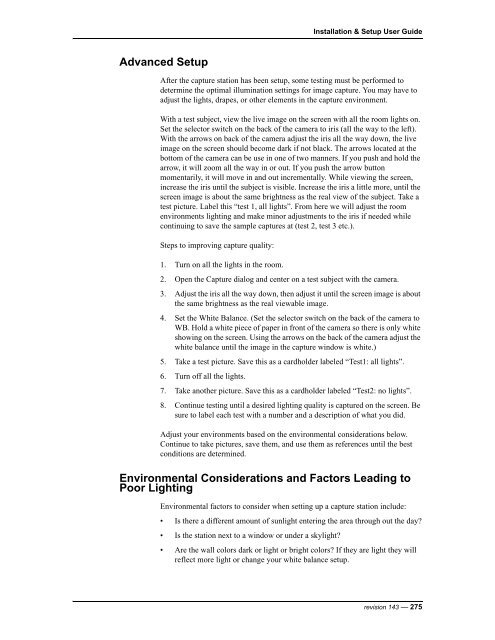
<strong>Installation</strong> & <strong>Setup</strong> <strong>User</strong> <strong>Guide</strong><br />
Advanced <strong>Setup</strong><br />
After the capture station has been setup, some testing must be performed to<br />
determine the optimal illumination settings for image capture. You may have to<br />
adjust the lights, drapes, or other elements in the capture environment.<br />
With a test subject, view the live image on the screen with all the room lights on.<br />
Set the selector switch on the back of the camera to iris (all the way to the left).<br />
With the arrows on back of the camera adjust the iris all the way down, the live<br />
image on the screen should become dark if not black. The arrows located at the<br />
bottom of the camera can be use in one of two manners. If you push and hold the<br />
arrow, it will zoom all the way in or out. If you push the arrow button<br />
momentarily, it will move in and out incrementally. While viewing the screen,<br />
increase the iris until the subject is visible. Increase the iris a little more, until the<br />
screen image is about the same brightness as the real view of the subject. Take a<br />
test picture. Label this “test 1, all lights”. From here we will adjust the room<br />
environments lighting and make minor adjustments to the iris if needed while<br />
continuing to save the sample captures at (test 2, test 3 etc.).<br />
Steps to improving capture quality:<br />
1. Turn on all the lights in the room.<br />
2. Open the Capture dialog and center on a test subject with the camera.<br />
3. Adjust the iris all the way down, then adjust it until the screen image is about<br />
the same brightness as the real viewable image.<br />
4. Set the White Balance. (Set the selector switch on the back of the camera to<br />
WB. Hold a white piece of paper in front of the camera so there is only white<br />
showing on the screen. Using the arrows on the back of the camera adjust the<br />
white balance until the image in the capture window is white.)<br />
5. Take a test picture. Save this as a cardholder labeled “Test1: all lights”.<br />
6. Turn off all the lights.<br />
7. Take another picture. Save this as a cardholder labeled “Test2: no lights”.<br />
8. Continue testing until a desired lighting quality is captured on the screen. Be<br />
sure to label each test with a number and a description of what you did.<br />
Adjust your environments based on the environmental considerations below.<br />
Continue to take pictures, save them, and use them as references until the best<br />
conditions are determined.<br />
Environmental Considerations and Factors Leading to<br />
Poor Lighting<br />
Environmental factors to consider when setting up a capture station include:<br />
• Is there a different amount of sunlight entering the area through out the day<br />
• Is the station next to a window or under a skylight<br />
• Are the wall colors dark or light or bright colors If they are light they will<br />
reflect more light or change your white balance setup.<br />
revision 143 — 275


![B.A.S.I.S. G Service Manual [T63300] - Best Access Systems](https://img.yumpu.com/48375082/1/190x245/basis-g-service-manual-t63300-best-access-systems.jpg?quality=85)

