Gemini GV6K and Gemini GT6K Programmer's Guide
Gemini GV6K and Gemini GT6K Programmer's Guide
Gemini GV6K and Gemini GT6K Programmer's Guide

Create successful ePaper yourself
Turn your PDF publications into a flip-book with our unique Google optimized e-Paper software.
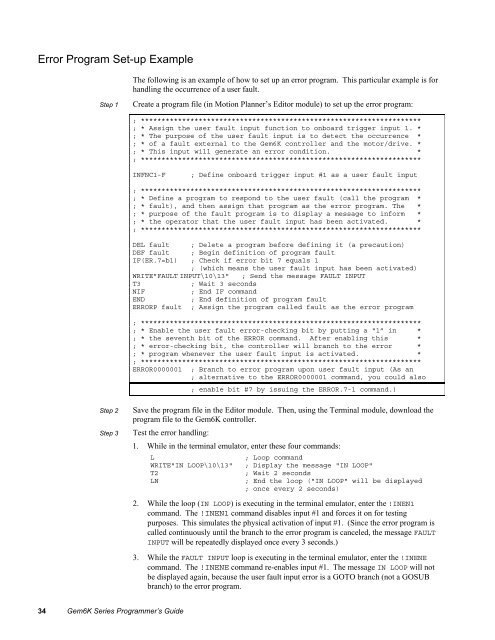
Error Program Set-up Example<br />
The following is an example of how to set up an error program. This particular example is for<br />
h<strong>and</strong>ling the occurrence of a user fault.<br />
Step 1<br />
Create a program file (in Motion Planner’s Editor module) to set up the error program:<br />
; ********************************************************************<br />
; * Assign the user fault input function to onboard trigger input 1. *<br />
; * The purpose of the user fault input is to detect the occurrence *<br />
; * of a fault external to the Gem6K controller <strong>and</strong> the motor/drive. *<br />
; * This input will generate an error condition. *<br />
; ********************************************************************<br />
INFNC1-F<br />
; Define onboard trigger input #1 as a user fault input<br />
; ********************************************************************<br />
; * Define a program to respond to the user fault (call the program *<br />
; * fault), <strong>and</strong> then assign that program as the error program. The *<br />
; * purpose of the fault program is to display a message to inform *<br />
; * the operator that the user fault input has been activated. *<br />
; ********************************************************************<br />
DEL fault ; Delete a program before defining it (a precaution)<br />
DEF fault ; Begin definition of program fault<br />
IF(ER.7=b1) ; Check if error bit 7 equals 1<br />
; (which means the user fault input has been activated)<br />
WRITE"FAULT INPUT\10\13" ; Send the message FAULT INPUT<br />
T3<br />
; Wait 3 seconds<br />
NIF<br />
; End IF comm<strong>and</strong><br />
END<br />
; End definition of program fault<br />
ERRORP fault ; Assign the program called fault as the error program<br />
; ********************************************************************<br />
; * Enable the user fault error-checking bit by putting a “1” in *<br />
; * the seventh bit of the ERROR comm<strong>and</strong>. After enabling this *<br />
; * error-checking bit, the controller will branch to the error *<br />
; * program whenever the user fault input is activated. *<br />
; ********************************************************************<br />
ERROR0000001 ; Branch to error program upon user fault input (As an<br />
; alternative to the ERROR0000001 comm<strong>and</strong>, you could also<br />
; enable bit #7 by issuing the ERROR.7-1 comm<strong>and</strong>.)<br />
Step 2<br />
Step 3<br />
Save the program file in the Editor module. Then, using the Terminal module, download the<br />
program file to the Gem6K controller.<br />
Test the error h<strong>and</strong>ling:<br />
1. While in the terminal emulator, enter these four comm<strong>and</strong>s:<br />
L<br />
; Loop comm<strong>and</strong><br />
WRITE"IN LOOP\10\13" ; Display the message "IN LOOP"<br />
T2<br />
LN<br />
; Wait 2 seconds<br />
; End the loop ("IN LOOP" will be displayed<br />
; once every 2 seconds)<br />
2. While the loop (IN LOOP) is executing in the terminal emulator, enter the !INEN1<br />
comm<strong>and</strong>. The !INEN1 comm<strong>and</strong> disables input #1 <strong>and</strong> forces it on for testing<br />
purposes. This simulates the physical activation of input #1. (Since the error program is<br />
called continuously until the branch to the error program is canceled, the message FAULT<br />
INPUT will be repeatedly displayed once every 3 seconds.)<br />
3. While the FAULT INPUT loop is executing in the terminal emulator, enter the !INENE<br />
comm<strong>and</strong>. The !INENE comm<strong>and</strong> re-enables input #1. The message IN LOOP will not<br />
be displayed again, because the user fault input error is a GOTO branch (not a GOSUB<br />
branch) to the error program.<br />
34 Gem6K Series Programmer’s <strong>Guide</strong>