- Page 2:
INTRODUCTION Read this manual caref
- Page 6 and 7:
MACHINE NUMBERS The manufacturing N
- Page 8 and 9:
CONTENTS MACHINE NUMBERS SAFETY Rec
- Page 10 and 11:
CONTENTS Maintenance Guide.........
- Page 12 and 13:
SAFETY RECOGNIZE SAFETY INFORMATION
- Page 14 and 15:
SAFETY PREPARE FOR EMERGENCIES •
- Page 16 and 17:
SAFETY USE HANDHOLDS AND STEPS •
- Page 18 and 19:
SAFETY OPERATE ONLY FROM OPERATOR'S
- Page 20 and 21:
SAFETY INVESTIGATE JOB SITE BEFOREH
- Page 22 and 23:
SAFETY DRIVE MACHINE SAFELY • Bef
- Page 24 and 25:
AVOID INJURY FROM ROLLAWAY ACCIDENT
- Page 26 and 27:
KEEP PERSON CLEAR FROM WORKING AREA
- Page 28 and 29:
SAFETY DIG WITH CAUTION • Acciden
- Page 30 and 31:
SAFETY PROTECT AGAINST FLYING DEBRI
- Page 32 and 33:
SAFETY PRACTICE SAFE MAINTENANCE To
- Page 34 and 35:
SAFETY PREVENT PARTS FROM FLYING
- Page 36 and 37:
SAFETY AVOID HIGH-PRESSURE FLUIDS
- Page 38 and 39:
SAFETY EVACUATING IN CASE OF FIRE
- Page 40 and 41:
SAFETY BEWARE OF ASBESTOS DUST •
- Page 42 and 43:
SAFETY SIGNS/Europe/Asia/Middle and
- Page 44 and 45:
SAFETY SIGNS/Europe/Asia/Middle and
- Page 46 and 47:
SAFETY SIGNS/Europe/Asia/Middle and
- Page 48 and 49:
SAFETY SIGNS/Europe/Asia/Middle and
- Page 50 and 51:
OPERATOR'S COMPONENTS STATION NAME
- Page 52 and 53:
OPERATOR'S STATION MULTI FUNCTION M
- Page 54 and 55:
OPERATOR'S STATION • Display of M
- Page 56 and 57:
OPERATOR'S STATION Menu Screen (23)
- Page 58 and 59:
OPERATOR'S STATION Menu Key Shifts
- Page 60 and 61:
Displaying Basic Screen by Password
- Page 62 and 63:
OPERATOR'S STATION 3. If inputting
- Page 64 and 65:
OPERATOR'S STATION ALARM OCCURRENCE
- Page 66 and 67:
OPERATOR'S STATION CONTENTS OF ALAR
- Page 68 and 69:
OPERATOR'S STATION CLOCK SETTING Pr
- Page 70 and 71:
OPERATOR'S STATION Selecting an Att
- Page 72 and 73:
OPERATOR'S STATION Pulverizer 1 Max
- Page 74 and 75:
DISPLAYING OPERATING CONDITIONS OPE
- Page 76 and 77:
OPERATOR'S STATION 4. Push key 6 ,
- Page 78 and 79:
4. Push key 6 , and return to the b
- Page 80 and 81:
OPERATOR'S STATION Password Change
- Page 82 and 83:
OPERATOR'S STATION 7. The message
- Page 84 and 85:
OPERATOR'S STATION Auto-Control: OF
- Page 86 and 87:
OPERATOR'S STATION Change Interval
- Page 88 and 89:
OPERATOR'S STATION Screen Display w
- Page 90 and 91:
OPERATOR'S STATION Mail (Optional)
- Page 92 and 93:
OPERATOR'S STATION LANGUAGE SETTING
- Page 94 and 95:
OPERATOR'S STATION SWITCH PANEL 1-
- Page 96 and 97:
OPERATOR'S STATION POWER MODE SWITC
- Page 98 and 99:
OPERATOR'S STATION WIPER/WASHER SWI
- Page 100 and 101:
OPERATOR'S STATION SWITCH PANEL (Op
- Page 102 and 103:
OPERATOR'S STATION KEY SWITCH 1- OF
- Page 104 and 105:
OPERATOR'S STATION CAB LIGHT Turn t
- Page 106 and 107:
OPERATOR'S STATION FUSE BOX 10- CON
- Page 108 and 109:
OPERATOR'S STATION Control Panel De
- Page 110 and 111:
OPERATOR'S STATION • Circulation
- Page 112 and 113:
OPERATOR'S STATION DEFROSTER OPERAT
- Page 114 and 115:
OPERATOR'S STATION CAB HEATER (Opti
- Page 116 and 117:
OPERATOR'S STATION DEFROSTER OPERAT
- Page 118 and 119:
OPERATOR'S STATION Station Presetti
- Page 120 and 121:
OPERATOR'S STATION CLOSING UPPER FR
- Page 122 and 123:
OPERATOR'S STATION OPENING/CLOSING
- Page 124 and 125:
OPERATOR'S STATION ADJUSTING THE SE
- Page 126 and 127:
ADJUSTING THE AIR-SUSPENSION SEAT (
- Page 128 and 129:
OPERATOR'S STATION ADJUSTING CONSOL
- Page 130 and 131:
BREAK-IN OBSERVE ENGINE OPERATION C
- Page 132 and 133:
OPERATING THE ENGINE INSPECT MACHIN
- Page 134 and 135:
OPERATING THE ENGINE STARTING THE E
- Page 136 and 137:
OPERATING THE ENGINE STARTING IN CO
- Page 138 and 139:
CHECK INSTRUMENTS AFTER STARTING OP
- Page 140 and 141:
OPERATING THE ENGINE Disconnecting
- Page 142 and 143:
DRIVING THE MACHINE DRIVE THE MACHI
- Page 144 and 145:
STEERING THE MACHINE USING LEVERS D
- Page 146 and 147:
DRIVING THE MACHINE OPERATING ON SO
- Page 148 and 149:
DRIVING THE MACHINE OPERATING IN WA
- Page 150 and 151:
OPERATING THE MACHINE CONTROL LEVER
- Page 152 and 153:
OPERATING THE MACHINE ATTACHMENT PE
- Page 154 and 155:
OPERATING THE MACHINE Warming-up Op
- Page 156 and 157:
OPERATING THE MACHINE AUTO-IDLE 1 W
- Page 158 and 159:
OPERATING THE MACHINE WORK MODE SEL
- Page 160 and 161:
OPERATING THE MACHINE POWER MODE On
- Page 162 and 163: OPERATING THE MACHINE FACE SHOVEL O
- Page 164 and 165: OPERATING THE MACHINE HYDRAULIC BRE
- Page 166 and 167: ZX180-3, 200-3, 270-3, 330-3 Class
- Page 168 and 169: OPERATING THE MACHINE Pressure Meas
- Page 170 and 171: OPERATING THE MACHINE • Do not op
- Page 172 and 173: OPERATING THE MACHINE BREAKER MAINT
- Page 174 and 175: OPERATING THE MACHINE • When oper
- Page 176 and 177: OPERATING THE MACHINE • Breaker o
- Page 178 and 179: Crusher (ZX120-3 Class) OPERATING T
- Page 180 and 181: OPERATING THE MACHINE PRECAUTION FO
- Page 182 and 183: EMERGENCY BOOM LOWERING PROCEDURE (
- Page 184 and 185: OBJECT HANDLING --- IF EQUIPPED OPE
- Page 186 and 187: TRANSPORTING TRANSPORTING BY ROAD W
- Page 188 and 189: 4. Stop the engine. Remove the key
- Page 190 and 191: TRANSPORTING MACHINE LIFTING PROCED
- Page 192 and 193: CORRECT MAINTENANCE AND INSPECTION
- Page 194 and 195: MAINTENANCE LAYOUT Arm Cylinder Arm
- Page 196 and 197: MAINTENANCE Maintenance Guide Table
- Page 198 and 199: MAINTENANCE HOOD AND ACCESS COVERS
- Page 200 and 201: MAINTENANCE PERIODIC REPLACEMENT OF
- Page 202 and 203: MAINTENANCE C. TRANSMISSION (See Pa
- Page 204 and 205: H. ELECTRICAL SYSTEM (See Page 7-62
- Page 206 and 207: MAINTENANCE Brand Names of Recommen
- Page 208 and 209: MAINTENANCE • Boom and Arm Joint
- Page 210 and 211: MAINTENANCE 3 Swing Internal Gear -
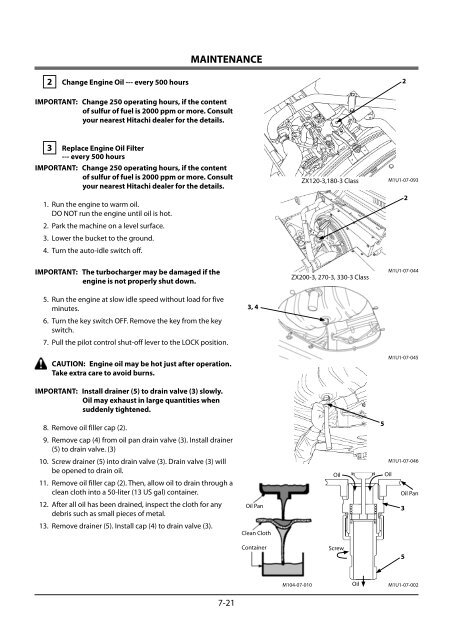
- Page 214 and 215: MAINTENANCE C. TRANSMISSION 1 Pump
- Page 216 and 217: MAINTENANCE 3 Travel Reduction Gear
- Page 218 and 219: MAINTENANCE D. HYDRAULIC SYSTEM INS
- Page 220 and 221: MAINTENANCE BREAKER MAINTENANCE Cha
- Page 222 and 223: MAINTENANCE 2 Change Hydraulic Oil
- Page 224 and 225: MAINTENANCE Air Bleeding Procedures
- Page 226 and 227: MAINTENANCE 5 Replace Pilot Oil Fil
- Page 228 and 229: MAINTENANCE 7 Check Hoses and Lines
- Page 230 and 231: MAINTENANCE Table 2. Lines Interval
- Page 232 and 233: MAINTENANCE Metal Face Seal Fitting
- Page 234 and 235: MAINTENANCE 8. To avoid condensatio
- Page 236 and 237: MAINTENANCE 2 Drain Fuel Filter ---
- Page 238 and 239: MAINTENANCE Air Bleeding Procedures
- Page 240 and 241: MAINTENANCE 3 Replace Fuel Main Fil
- Page 242 and 243: MAINTENANCE 5 Clean Fuel Solenoid P
- Page 244 and 245: MAINTENANCE F. AIR CLEANER 1 Clean
- Page 246 and 247: MAINTENANCE G. COOLING SYSTEM Coola
- Page 248 and 249: MAINTENANCE 1 Check Coolant Level -
- Page 250 and 251: MAINTENANCE 2 Check and Adjust Fan
- Page 252 and 253: MAINTENANCE 4 Clean Radiator, Oil C
- Page 254 and 255: MAINTENANCE If acid is swallowed: 1
- Page 256 and 257: MAINTENANCE Check electrolyte speci
- Page 258 and 259: MAINTENANCE • Fusible Link (Main
- Page 260 and 261: 3. Clean shank (6) surface. 4. Inst
- Page 262 and 263:
MAINTENANCE c. Removing the tooth p
- Page 264 and 265:
MAINTENANCE 3 Convert Bucket Connec
- Page 266 and 267:
MAINTENANCE 5 Remove Travel Levers
- Page 268 and 269:
MAINTENANCE 8 Check Track Sag --- e
- Page 270 and 271:
MAINTENANCE 9 Clean and Replace Air
- Page 272 and 273:
MAINTENANCE 10 Check Air Conditione
- Page 274 and 275:
MAINTENANCE 12 Retighten Cylinder H
- Page 276 and 277:
MAINTENANCE 17 Check Tightening Tor
- Page 278 and 279:
MAINTENANCE 17 Check Tightening Tor
- Page 280 and 281:
MAINTENANCE 17 Check Tightening Tor
- Page 282 and 283:
1. Engine cushion rubber mounting b
- Page 284 and 285:
MAINTENANCE 6. Pump transmission mo
- Page 286 and 287:
MAINTENANCE 12. Battery mounting nu
- Page 288 and 289:
MAINTENANCE 17. Travel device mount
- Page 290 and 291:
HYDRAULIC CIRCUIT HYDRAULIC CIRCUIT
- Page 292 and 293:
ELECTRICAL DIAGRAM 8-
- Page 294 and 295:
MAINTENANCE UNDER SPECIAL ENVIRONME
- Page 296 and 297:
STORAGE STORING THE MACHINE 1. Insp
- Page 298 and 299:
TROUBLESHOOTING IMPOSSIBLE TO START
- Page 300 and 301:
TROUBLESHOOTING ENGINE Problem Caus
- Page 302 and 303:
TROUBLESHOOTING ENGINE Problem Caus
- Page 304 and 305:
TROUBLESHOOTING ELECTRICAL SYSTEM P
- Page 306 and 307:
TROUBLESHOOTING CONTROL LEVERS Prob
- Page 308 and 309:
TROUBLESHOOTING HYDRAULIC SYSTEM Pr
- Page 310 and 311:
SPECIFICATIONS SPECIFICATIONS ZX110
- Page 312 and 313:
SPECIFICATIONS SHOE TYPES AND APPLI
- Page 314 and 315:
SPECIFICATIONS BUCKET TYPES AND APP
- Page 316 and 317:
SPECIFICATIONS WORKING RANGES ZX130
- Page 318 and 319:
SPECIFICATIONS SHOE TYPES AND APPLI
- Page 320 and 321:
SPECIFICATIONS SPECIFICATIONS ZX160
- Page 322 and 323:
SPECIFICATIONS ZX160LC-3 (Machine w
- Page 324 and 325:
SPECIFICATIONS BUCKET TYPES AND APP
- Page 326 and 327:
SPECIFICATIONS WORKING RANGES ZX180
- Page 328 and 329:
SPECIFICATIONS SHOE TYPES AND APPLI
- Page 330 and 331:
SPECIFICATIONS SPECIFICATIONS ZX210
- Page 332 and 333:
SPECIFICATIONS SHOE TYPES AND APPLI
- Page 334 and 335:
SPECIFICATIONS SPECIFICATIONS ZX210
- Page 336 and 337:
SPECIFICATIONS SHOE TYPES AND APPLI
- Page 338 and 339:
SPECIFICATIONS SPECIFICATIONS ZX250
- Page 340 and 341:
SPECIFICATIONS SHOE TYPES AND APPLI
- Page 342 and 343:
SPECIFICATIONS SPECIFICATIONS ZX280
- Page 344 and 345:
SPECIFICATIONS SHOE TYPES AND APPLI
- Page 346 and 347:
SPECIFICATIONS SPECIFICATIONS ZX350
- Page 348 and 349:
SPECIFICATIONS SHOE TYPES AND APPLI
- Page 350 and 351:
SPECIFICATIONS SOUND LEVEL RESULTS
- Page 352 and 353:
USING PAD CRAWLER SHOE ZX120-3, 200
- Page 354 and 355:
OPTIONAL ATTACHMENTS AND DEVICES TR
- Page 356 and 357:
OPTIONAL ATTACHMENTS AND DEVICES Lo
- Page 358 and 359:
OPTIONAL ATTACHMENTS AND DEVICES BL
- Page 360 and 361:
OPTIONAL ATTACHMENTS AND DEVICES BL
- Page 362 and 363:
OPTIONAL ATTACHMENTS AND DEVICES WO
- Page 364 and 365:
OPTIONAL ATTACHMENTS AND DEVICES SP
- Page 366 and 367:
SHOE TYPES AND APPLICATIONS ZX130-3
- Page 368 and 369:
OFFSET DIRECTION AND WORKING RANGE
- Page 370 and 371:
OPTIONAL ATTACHMENTS AND DEVICES MA
- Page 372 and 373:
OPTIONAL ATTACHMENTS AND DEVICES WO
- Page 374 and 375:
OPTIONAL ATTACHMENTS AND DEVICES 2-
- Page 376 and 377:
OPTIONAL ATTACHMENTS AND DEVICES
- Page 378 and 379:
OPTIONAL ATTACHMENTS AND DEVICES SP
- Page 380 and 381:
SHOE TYPES AND APPLICATIONS ZX130-3
- Page 382 and 383:
OPTIONAL ATTACHMENTS AND DEVICES SP
- Page 384 and 385:
SHOE TYPES AND APPLICATIONS OPTIONA
- Page 386 and 387:
OPTIONAL ATTACHMENTS AND DEVICES WO
- Page 388 and 389:
OPTIONAL ATTACHMENTS AND DEVICES SP
- Page 390 and 391:
SHOE TYPES AND APPLICATIONS OPTIONA
- Page 392 and 393:
OPTIONAL ATTACHMENTS AND DEVICES WO
- Page 394 and 395:
OPTIONAL ATTACHMENTS AND DEVICES SP
- Page 396 and 397:
SHOE TYPES AND APPLICATIONS OPTIONA
- Page 398 and 399:
OPTIONAL ATTACHMENTS AND DEVICES WA
- Page 400 and 401:
OPTIONAL ATTACHMENTS AND DEVICES LI
- Page 402 and 403:
OPTIONAL ATTACHMENTS AND DEVICES LI
- Page 404 and 405:
OPTIONAL ATTACHMENTS AND DEVICES LI
- Page 406 and 407:
OPTIONAL ATTACHMENTS AND DEVICES LI
- Page 408 and 409:
OPTIONAL ATTACHMENTS AND DEVICES LI
- Page 410 and 411:
OPTIONAL ATTACHMENTS AND DEVICES LI
- Page 412 and 413:
OPTIONAL ATTACHMENTS AND DEVICES LI
- Page 414 and 415:
OPTIONAL ATTACHMENTS AND DEVICES LI
- Page 416 and 417:
LIFTING CAPACITIES OPTIONAL ATTACHM
- Page 418 and 419:
OPTIONAL ATTACHMENTS AND DEVICES LI
- Page 420 and 421:
LIFTING CAPACITIES OPTIONAL ATTACHM
- Page 422 and 423:
OPTIONAL ATTACHMENTS AND DEVICES LI
- Page 424 and 425:
LIFTING CAPACITIES OPTIONAL ATTACHM
- Page 426 and 427:
OPTIONAL ATTACHMENTS AND DEVICES LI
- Page 428 and 429:
LIFTING CAPACITIES OPTIONAL ATTACHM
- Page 430 and 431:
OPTIONAL ATTACHMENTS AND DEVICES LI
- Page 432 and 433:
LIFTING CAPACITIES OPTIONAL ATTACHM
- Page 434 and 435:
OPTIONAL ATTACHMENTS AND DEVICES LI
- Page 436 and 437:
OPTIONAL ATTACHMENTS AND DEVICES LI
- Page 438 and 439:
OPTIONAL ATTACHMENTS AND DEVICES LI
- Page 440 and 441:
LIFTING CAPACITIES OPTIONAL ATTACHM
- Page 442 and 443:
LIFTING CAPACITIES OPTIONAL ATTACHM
- Page 444 and 445:
OPTIONAL ATTACHMENTS AND DEVICES LI
- Page 446 and 447:
OPTIONAL ATTACHMENTS AND DEVICES LI
- Page 448 and 449:
LIFTING CAPACITIES OPTIONAL ATTACHM
- Page 450 and 451:
LIFTING CAPACITIES OPTIONAL ATTACHM
- Page 452 and 453:
OPTIONAL ATTACHMENTS AND DEVICES LI
- Page 454 and 455:
OPTIONAL ATTACHMENTS AND DEVICES LI
- Page 456 and 457:
INDEX 2 2-piece Boom...............
- Page 458 and 459:
INDEX Never Undercut a High Bank...
- Page 460 and 461:
Working Ranges ZX280LC-3, 280LCN-3


