
You also want an ePaper? Increase the reach of your titles
YUMPU automatically turns print PDFs into web optimized ePapers that Google loves.
X-GAUGE saved in that memory slot. Saving the new X-GAUGE in that particular slot will overwrite<br />
any X-GAUGE data already present in that memory slot. Once you have the desired memory slot<br />
selected, press lower right function button next to SAVE. All the data will be written to that X-GAUGE<br />
memory slot, leaving the previously selected memory slot unchanged.<br />
Disabling an X-GAUGE<br />
To disable an X-GAUGE already in memory, start as if you were going to edit the gauge. In the TXD<br />
Screen, change the first character to a space. Continue to step through the editing fields by pressing the<br />
lower right function button next to OK and press SAVE to exit the screen. This will actually delete the<br />
data to transmit, which tells the ScanGauge not to use this X-GAUGE. The name will not be displayed.<br />
If you put transmit data back into this gauge, it will be reactivated.<br />
Displaying a Trip Value as an X-GAUGE<br />
You can set any of the built-in trip values and<br />
have them displayed as a gauge. This allows you<br />
to monitor trip functions along with other gauge<br />
functions.<br />
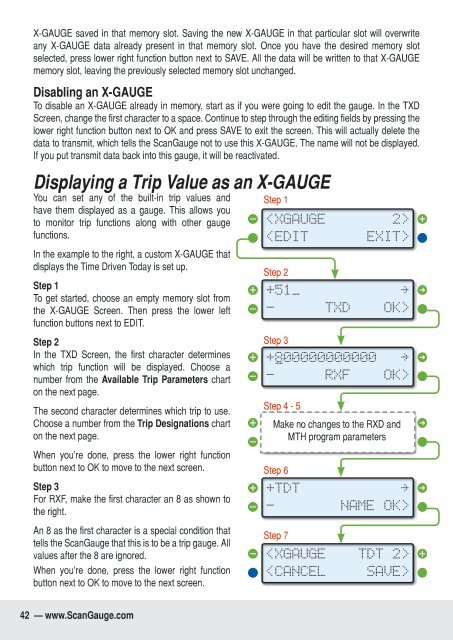
In the example to the right, a custom X-GAUGE that<br />
displays the Time Driven Today is set up.<br />
Step 1<br />
To get started, choose an empty memory slot from<br />
the X-GAUGE Screen. Then press the lower left<br />
function buttons next to EDIT.<br />
Step 2<br />
In the TXD Screen, the first character determines<br />
which trip function will be displayed. Choose a<br />
number from the Available Trip Parameters chart<br />
on the next page.<br />
The second character determines which trip to use.<br />
Choose a number from the Trip Designations chart<br />
on the next page.<br />
When you’re done, press the lower right function<br />
button next to OK to move to the next screen.<br />
Step 3<br />
For RXF, make the first character an 8 as shown to<br />
the right.<br />
An 8 as the first character is a special condition that<br />
tells the ScanGauge that this is to be a trip gauge. All<br />
values after the 8 are ignored.<br />
When you’re done, press the lower right function<br />
button next to OK to move to the next screen.<br />
Step 1<br />
<br />
»<br />
OK><br />
+800000000000<br />
_<br />
»<br />
- RXF OK><br />
+0000 Make _ no changes to the RXD and »<br />
-<br />
MTH program<br />
RXD<br />
parameters<br />
OK><br />
+TDT<br />
-<br />
<br />
SAVE><br />
42 — www.ScanGauge.com