Jansen-Economy 50 E30 Jansen-Economy 50 E30 Jansen-Economy 50 E30
331 Profile - gilbert
331 Profile - gilbert
You also want an ePaper? Increase the reach of your titles
YUMPU automatically turns print PDFs into web optimized ePapers that Google loves.
Verarbeitungs-Hinweise<br />
Indications d’usinage<br />
Assembly instructions<br />
<strong>Jansen</strong>-<strong>Economy</strong> <strong>50</strong> <strong>E30</strong><br />
<strong>Jansen</strong>-<strong>Economy</strong> <strong>50</strong> <strong>E30</strong><br />
<strong>Jansen</strong>-<strong>Economy</strong> <strong>50</strong> <strong>E30</strong><br />
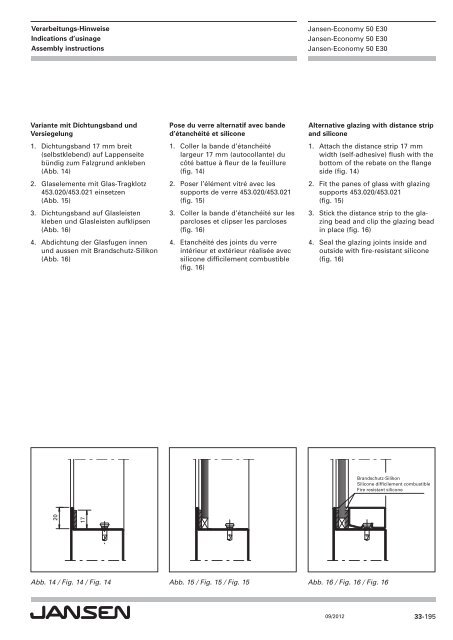
Variante mit Dichtungsband und<br />
Versiegelung<br />
1. Dichtungsband 17 mm breit<br />
(selbstklebend) auf Lappenseite<br />
bündig zum Falzgrund ankleben<br />
(Abb. 14)<br />
2. Glaselemente mit Glas-Tragklotz<br />
453.020/453.021 einsetzen<br />
(Abb. 15)<br />
3. Dichtungsband auf Glasleisten<br />
kleben und Glasleisten aufklipsen<br />
(Abb. 16)<br />
4. Abdichtung der Glasfugen innen<br />
und aussen mit Brandschutz-Silikon<br />
(Abb. 16)<br />
Pose du verre alternatif avec bande<br />
d’étanchéité et silicone<br />
1. Coller la bande d’étanchéité<br />
largeur 17 mm (autocollante) du<br />
côté battue à fleur de la feuillure<br />
(fig. 14)<br />
2. Poser l’élément vitré avec les<br />
supports de verre 453.020/453.021<br />
(fig. 15)<br />
3. Coller la bande d’étanchéité sur les<br />
parcloses et clipser les parcloses<br />
(fig. 16)<br />
4. Etanchéité des joints du verre<br />
intérieur et extérieur réalisée avec<br />
silicone difficilement combustible<br />
(fig. 16)<br />
Alternative glazing with distance strip<br />
and silicone<br />
1. Attach the distance strip 17 mm<br />
width (self-adhesive) flush with the<br />
bottom of the rebate on the flange<br />
side (fig. 14)<br />
2. Fit the panes of glass with glazing<br />
supports 453.020/453.021<br />
(fig. 15)<br />
3. Stick the distance strip to the glazing<br />
bead and clip the glazing bead<br />
in place (fig. 16)<br />
4. Seal the glazing joints inside and<br />
outside with fire-resistant silicone<br />
(fig. 16)<br />
Brandschutz-Silikon<br />
Silicone difficilement combustible<br />
Fire resistant silicone<br />
20<br />
17<br />
Abb. 14 / Fig. 14 / Fig. 14 Abb. 15 / Fig. 15 / Fig. 15<br />
Abb. 16 / Fig. 16 / Fig. 16<br />
09/2012<br />
33-195


