Download Pioneer AVIC U310BT Operation Manual
Download Pioneer AVIC U310BT Operation Manual
Download Pioneer AVIC U310BT Operation Manual

You also want an ePaper? Increase the reach of your titles
YUMPU automatically turns print PDFs into web optimized ePapers that Google loves.
Audio adjustments<br />
Vocal<br />
Vocal is a curve in which the midrange, which is the<br />
human vocal range, is boosted.<br />
Flat<br />
Flat is a flat curve in which nothing is boosted.<br />
Custom<br />
Custom is an adjusted equalizer curve that you create.<br />
A separate custom curve can be created for each<br />
source.<br />
1 Display the “Audio Menu” screen.<br />
= For details, refer to Displaying the<br />
“Audio Menu” screen on the previous<br />
page.<br />
2 Turn MULTI-CONTROL to select<br />
“Preset Equalizer”.<br />
3 Press MULTI-CONTROL left or right to<br />
select an equalizer curve.<br />
Adjusting the equalizer curves<br />
You can adjust the currently selected equalizer<br />
curve setting as desired. Adjustments can be<br />
made with a 3-band parametric equalizer.<br />
! Band:<br />
You can select the equalizer band.<br />
! Frequency:<br />
You can select which frequency to set as<br />
the center frequency.<br />
! Level:<br />
You can select the decibel (dB) level of the<br />
selected EQ.<br />
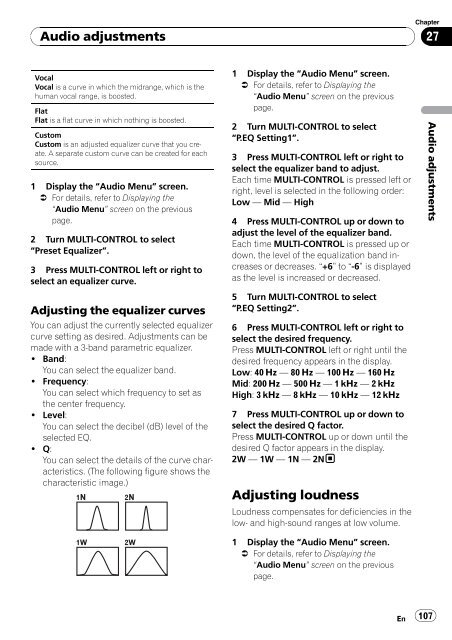
! Q:<br />
You can select the details of the curve characteristics.<br />
(The following figure shows the<br />
characteristic image.)<br />
1 Display the “Audio Menu” screen.<br />
= For details, refer to Displaying the<br />
“Audio Menu” screen on the previous<br />
page.<br />
2 Turn MULTI-CONTROL to select<br />
“P.EQ Setting1”.<br />
3 Press MULTI-CONTROL left or right to<br />
select the equalizer band to adjust.<br />
Each time MULTI-CONTROL is pressed left or<br />
right, level is selected in the following order:<br />
Low — Mid — High<br />
4 Press MULTI-CONTROL up or down to<br />
adjust the level of the equalizer band.<br />
Each time MULTI-CONTROL is pressed up or<br />
down, the level of the equalization band increases<br />
or decreases. “+6” to “-6” is displayed<br />
as the level is increased or decreased.<br />
5 Turn MULTI-CONTROL to select<br />
“P.EQ Setting2”.<br />
6 Press MULTI-CONTROL left or right to<br />
select the desired frequency.<br />
Press MULTI-CONTROL left or right until the<br />
desired frequency appears in the display.<br />
Low: 40 Hz — 80 Hz — 100 Hz — 160 Hz<br />
Mid: 200 Hz — 500 Hz — 1 kHz — 2 kHz<br />
High: 3 kHz — 8 kHz — 10 kHz — 12 kHz<br />
7 Press MULTI-CONTROL up or down to<br />
select the desired Q factor.<br />
Press MULTI-CONTROL up or down until the<br />
desired Q factor appears in the display.<br />
2W — 1W — 1N — 2N<br />
Adjusting loudness<br />
Loudness compensates for deficiencies in the<br />
low- and high-sound ranges at low volume.<br />
1 Display the “Audio Menu” screen.<br />
= For details, refer to Displaying the<br />
“Audio Menu” screen on the previous<br />
page.<br />
En<br />
Chapter<br />
27<br />
107<br />
Audio adjustments