Old School Chopper Frame Fabrication - Knucklebuster
Old School Chopper Frame Fabrication - Knucklebuster
Old School Chopper Frame Fabrication - Knucklebuster

Create successful ePaper yourself
Turn your PDF publications into a flip-book with our unique Google optimized e-Paper software.
Using an indelible marker outline the miter path around the inside edge of the paper template and slip if off the tube before<br />
starting the trimming operation.<br />
If you need to remove a lot of material you can trim the tube back to within an eighth or so of the marked line using a<br />
reciprocal saw and then finish up the fine cutting with a grinder. The objective is to create a nice tight joint at the intersection<br />
and also to move the wishbone tubes in towards, and parallel with, the centerline of the frame keeping the 8-3/8” inside<br />
clearance.<br />
Just keep grinding, filing and fitting a little at a time until the connections are perfect on both sides of the backbone and the<br />
distance between the wishbones is 8-3/8” right about where the fender mount cross member will eventually be welded.<br />
You’ve probably been in a bike shop somewhere or over at a friends house while someone is trying to install a new rear<br />
wheel and the swing-arms or the wishbones on a rigid frame are too narrow for the hub and spacers to be installed without<br />
using a small bottle jack to pry the rear end of the frame out a little bit. Well this isn’t supposed to happen but every time you<br />
make a weld a little bit of material gets displaced and shrinks upon cooling and on motorcycle in general the tendency is for<br />
the back end of the frame to get sucked in slightly during the final welding process so it’s a little tighter than the specs call<br />
for. To account for this phenomenon I strongly suggest that you fit the wishbone to the backbone in such a manner so that the<br />
measurement between the tubes near the axle plate location measures from three-sixteenths to a quarter of an inch more than<br />
at the fender mount cross member. If you have a choice here err on the side of too much space rather than to little.<br />
To get this clearance you'll have to trim just a very little bit more off the fish-mouths at the backbone connection so the<br />
wishbones flare out just ever so slightly on the rear end. Do not trim the fender mount cross member down below the 8-3/8"<br />
throat to throat dimension under any circumstances.<br />
Man, I love building motorcycles, hand me that hammer and where's the beer!<br />
Part 4<br />
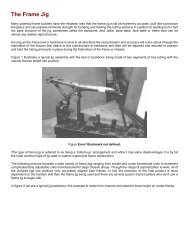
This new section was prepared after we made our move into the new digs so it may appear more disorganized than our<br />
normal state of disorganization so cut us some slack as to presentation quality but we've had dozens of folks asking us to get<br />
on with this series and to stop making excuses.<br />
At this point we’re ready to start building the down-tubes and bottom rails. Again the material is 1.25”x.120” ERW tubing.<br />
We’re going to make these pieces in two stages. Each down-tube/bottom rail piece needs to be 84 inches long. In the first<br />
stage we need to make the two bends where the down-tubes make their transition into the bottom rails as shown in Figure 19<br />
below.