Old School Chopper Frame Fabrication - Knucklebuster
Old School Chopper Frame Fabrication - Knucklebuster
Old School Chopper Frame Fabrication - Knucklebuster

You also want an ePaper? Increase the reach of your titles
YUMPU automatically turns print PDFs into web optimized ePapers that Google loves.
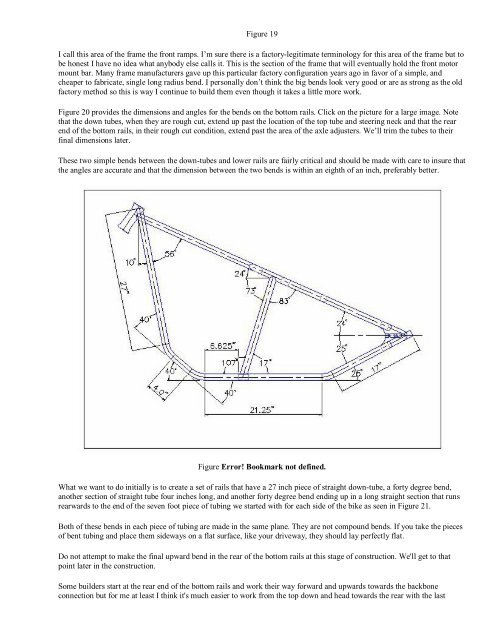
Figure 19<br />
I call this area of the frame the front ramps. I’m sure there is a factory-legitimate terminology for this area of the frame but to<br />
be honest I have no idea what anybody else calls it. This is the section of the frame that will eventually hold the front motor<br />
mount bar. Many frame manufacturers gave up this particular factory configuration years ago in favor of a simple, and<br />
cheaper to fabricate, single long radius bend. I personally don’t think the big bends look very good or are as strong as the old<br />
factory method so this is way I continue to build them even though it takes a little more work.<br />
Figure 20 provides the dimensions and angles for the bends on the bottom rails. Click on the picture for a large image. Note<br />
that the down tubes, when they are rough cut, extend up past the location of the top tube and steering neck and that the rear<br />
end of the bottom rails, in their rough cut condition, extend past the area of the axle adjusters. We’ll trim the tubes to their<br />
final dimensions later.<br />
These two simple bends between the down-tubes and lower rails are fairly critical and should be made with care to insure that<br />
the angles are accurate and that the dimension between the two bends is within an eighth of an inch, preferably better.<br />
Figure Error! Bookmark not defined.<br />
What we want to do initially is to create a set of rails that have a 27 inch piece of straight down-tube, a forty degree bend,<br />
another section of straight tube four inches long, and another forty degree bend ending up in a long straight section that runs<br />
rearwards to the end of the seven foot piece of tubing we started with for each side of the bike as seen in Figure 21.<br />
Both of these bends in each piece of tubing are made in the same plane. They are not compound bends. If you take the pieces<br />
of bent tubing and place them sideways on a flat surface, like your driveway, they should lay perfectly flat.<br />
Do not attempt to make the final upward bend in the rear of the bottom rails at this stage of construction. We'll get to that<br />
point later in the construction.<br />
Some builders start at the rear end of the bottom rails and work their way forward and upwards towards the backbone<br />
connection but for me at least I think it's much easier to work from the top down and head towards the rear with the last