Old School Chopper Frame Fabrication - Knucklebuster
Old School Chopper Frame Fabrication - Knucklebuster
Old School Chopper Frame Fabrication - Knucklebuster

Create successful ePaper yourself
Turn your PDF publications into a flip-book with our unique Google optimized e-Paper software.
In case you're interested I messed up the left hand rail by putting it in the bender pointing in the wrong direction and doing<br />
the bend at the same time that I was trying to carry on a phone conversation with another frame builder who probably did the<br />
very same thing as we were comparing notes on exactly how to best describe this particular bend to others. In the end it all<br />
worked out pretty good as I ended up with a sample of tube that shows perfectly how not to do something.<br />
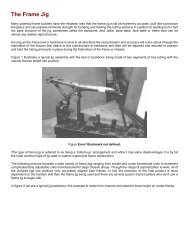
Within seconds of posting this page I was already getting calls about the 'backdrop' for Figure 8 and for those who might be<br />
interested the grayish clamshell looking thing is an old Edison Mutoscope that shows dirty pictures if you crank the handle<br />
and peek through the viewer. It's in the shop for welding on the case which is busted at the base. The orange thing is a 1937<br />
Rockola jukebox that we haven't had time to move into the house yet. The big white slabs are the doors from inside the house<br />
that were supposed to be re-hung three weeks ago. The other pieces of bent tubing laying around are parts of a Sportster<br />
chopper frame for Tom Toby that were supposed to shipped out in January.<br />
Part 8<br />
In part 7 we bent the lower rails to form the upsweep to the area of the axle plates and now we're ready to cut and install these<br />
plates but before we do it's a good idea to understand exactly how the axle adjusters came into being and what it is exactly<br />
that they do for us.<br />
On modern bikes the axle plates house the axle adjusters and in almost 99% of all cases bike owners and professional bike<br />
mechanics believe that the axle adjusters are used primarily to tension the final drive chain (or belt) and secondarily to align<br />
the rear wheel in the chassis.<br />
Well this is true up to a point but if we align the rear wheel in the chassis with the axle adjusters we have also in all<br />
likelihood misaligned the rear drive sprocket with the transmission sprocket unless we also realign the motor and<br />
transmission in the frame.<br />
In reality nobody does this so as a result we have constant premature wear on all of the drive components even though the<br />
bike goes straight down the road. Ironically the bike goes straight even thought the tire is wobbling about the hub axis<br />
because the adjusters only work in a horizontal direction and vertical alignment is totally ignored in almost all designs.<br />
At one time chain tensioning was taken care of by frame mounted 'chain tensioners' which do a superb job and do it correctly<br />
without changing the alignment of the wheel and transmission sprockets. Of course these devices were used when frames<br />
were built straight to begin with and the rear axles holes were properly aligned from the factory and there was no need to<br />
'adjust' the axle to achieve proper alignment.<br />
As mass production processes demanded cheaper manufacturing methods the so-called axle adjusters in the axle plates came<br />
into being. With the slotted axle holes you could build a little less than perfect frame and then monkey around with the<br />
wheel's axle to make the frame roll straight and halleluiah, you could also tension the chain at the same time saving about<br />
twenty bucks on every frame you built.<br />
So there we have it. Axle adjusters are used to 'adjust' an axle that isn't square with the frame or the transmission sprocket to<br />
begin with. The fact that you can also tension the final drive chain is just a freebie.<br />
In the real world 'axle adjusters' are totally unnecessary if you're using a frame mounted chain tensioner to keep the chain<br />
'slack' properly adjusted as it stretches.<br />
Our original frame designs all used a simple piece of 1.25" DOM tube with a 3/4" I.D. as the axle 'plate' but we found that<br />
even the large shops which spent thousands of dollars on their jigs could not produce frames that were straight enough to use<br />
this particular configuration. Small independent builders however, who can spend the time, have successfully adopted this<br />
style of axle collar and in fact I think that a few 'notable' builders have built some production frames on a limited basis using<br />
the 'old' style non-adjustable axle collars but that's another story.<br />
To get back on track we're going to make and install axle plates for the <strong>Old</strong> <strong>School</strong> frame in this article that incorporate<br />
conventional axle adjuster slots only because this type of plate is widely known and understood. These plates are made from<br />
3/8" thick cold rolled steel plate but there are literally hundreds of more inventive and creative ways to fabricate adjusters.<br />
Several builders and manufacturers have made their axle plates/adjusters a trademark or hallmark for their shops and its<br />
pretty easy to spot a frames origins by looking at the adjuster design. Paughco for instance uses an old-school type plate on