Old School Chopper Frame Fabrication - Knucklebuster
Old School Chopper Frame Fabrication - Knucklebuster
Old School Chopper Frame Fabrication - Knucklebuster

You also want an ePaper? Increase the reach of your titles
YUMPU automatically turns print PDFs into web optimized ePapers that Google loves.
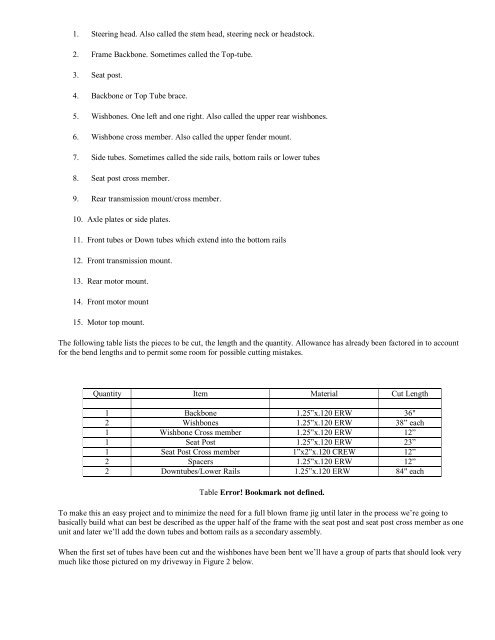
1. Steering head. Also called the stem head, steering neck or headstock.<br />
2. <strong>Frame</strong> Backbone. Sometimes called the Top-tube.<br />
3. Seat post.<br />
4. Backbone or Top Tube brace.<br />
5. Wishbones. One left and one right. Also called the upper rear wishbones.<br />
6. Wishbone cross member. Also called the upper fender mount.<br />
7. Side tubes. Sometimes called the side rails, bottom rails or lower tubes<br />
8. Seat post cross member.<br />
9. Rear transmission mount/cross member.<br />
10. Axle plates or side plates.<br />
11. Front tubes or Down tubes which extend into the bottom rails<br />
12. Front transmission mount.<br />
13. Rear motor mount.<br />
14. Front motor mount<br />
15. Motor top mount.<br />
The following table lists the pieces to be cut, the length and the quantity. Allowance has already been factored in to account<br />
for the bend lengths and to permit some room for possible cutting mistakes.<br />
Quantity Item Material Cut Length<br />
1 Backbone 1.25”x.120 ERW 36"<br />
2 Wishbones 1.25”x.120 ERW 38” each<br />
1 Wishbone Cross member 1.25”x.120 ERW 12”<br />
1 Seat Post 1.25”x.120 ERW 23”<br />
1 Seat Post Cross member 1”x2”x.120 CREW 12”<br />
2 Spacers 1.25”x.120 ERW 12”<br />
2 Downtubes/Lower Rails 1.25”x.120 ERW 84" each<br />
Table Error! Bookmark not defined.<br />
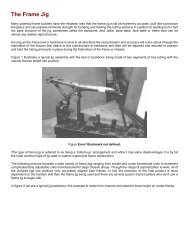
To make this an easy project and to minimize the need for a full blown frame jig until later in the process we’re going to<br />
basically build what can best be described as the upper half of the frame with the seat post and seat post cross member as one<br />
unit and later we’ll add the down tubes and bottom rails as a secondary assembly.<br />
When the first set of tubes have been cut and the wishbones have been bent we’ll have a group of parts that should look very<br />
much like those pictured on my driveway in Figure 2 below.