Old School Chopper Frame Fabrication - Knucklebuster
Old School Chopper Frame Fabrication - Knucklebuster
Old School Chopper Frame Fabrication - Knucklebuster

You also want an ePaper? Increase the reach of your titles
YUMPU automatically turns print PDFs into web optimized ePapers that Google loves.
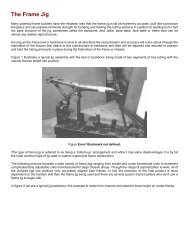
As you can see we're still moving into the new house so half of the garage is being used for storage. Access to the opposite<br />
side of the jig is blocked off by furniture so this frame will have to get by with only half of its lower rails for a few more<br />
weeks. No, that little Merry-Go-Round toy in the background isn't mine but it might look good as a gas tank on somebody's<br />
'Theme' bike.<br />
Once the tubes are in position we need to mark a line on the down tube where it touches the backbone. Make the line parallel<br />
with the top tube and about one quarter of an inch higher than the actual point where the two pieces of tubing intersect. As we<br />
begin cutting the fish-mouth in the down tube it will begin to lean inwards even more and as this angle increases the notch<br />
will 'appear' to move downwards relative to the backbone so we need to do the initial notching a little higher up on the tube to<br />
begin with. If you make the initial cuts to low you'll end up with a big gap in the down tube notch, under the intersection<br />
point with the top tube, and you won't be able to make a nice tight joint for welding.<br />
How you cut these notches in the down tubes is up to you and only limited by the number and types of tools you have at<br />
hand. Large shops usually use an end mill. Some places have built a separate fixture that holds a hole saw. You can do the<br />
cuts with a regular little disc grinder if you're careful. For custom work or one-offs I usually use a die grinder with a metal<br />
cutting bit for the rough cuts and switch to abrasive stones for the cleanup work. Even using the grinder it only takes about<br />
thirty minutes to make a very nice cut that's usually a lot more accurate than one cut with a hole saw.<br />
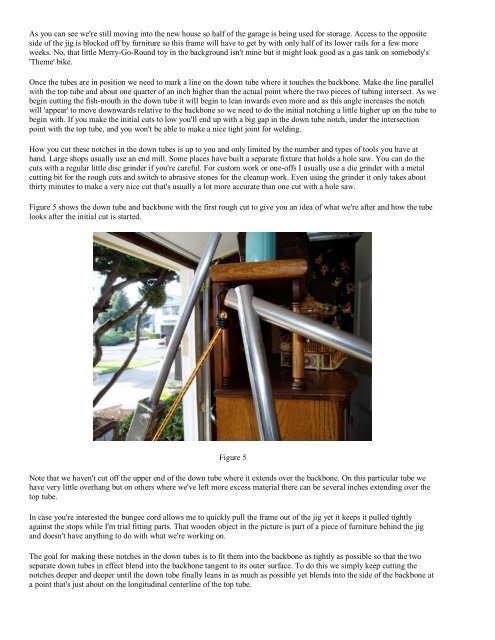
Figure 5 shows the down tube and backbone with the first rough cut to give you an idea of what we're after and how the tube<br />
looks after the initial cut is started.<br />
Figure 5<br />
Note that we haven't cut off the upper end of the down tube where it extends over the backbone. On this particular tube we<br />
have very little overhang but on others where we've left more excess material there can be several inches extending over the<br />
top tube.<br />
In case you're interested the bungee cord allows me to quickly pull the frame out of the jig yet it keeps it pulled tightly<br />
against the stops while I'm trial fitting parts. That wooden object in the picture is part of a piece of furniture behind the jig<br />
and doesn't have anything to do with what we're working on.<br />
The goal for making these notches in the down tubes is to fit them into the backbone as tightly as possible so that the two<br />
separate down tubes in effect blend into the backbone tangent to its outer surface. To do this we simply keep cutting the<br />
notches deeper and deeper until the down tube finally leans in as much as possible yet blends into the side of the backbone at<br />
a point that's just about on the longitudinal centerline of the top tube.