Original Instruction Manual Instructions d'emploi d'origine ... - Makita
Original Instruction Manual Instructions d'emploi d'origine ... - Makita
Original Instruction Manual Instructions d'emploi d'origine ... - Makita

Create successful ePaper yourself
Turn your PDF publications into a flip-book with our unique Google optimized e-Paper software.
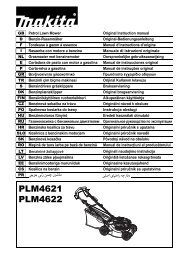
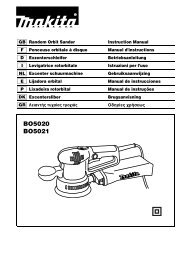
CHECKING THE SPARK PLUG<br />
– Only use the supplied universal wrench to remove or to install the spark plug.<br />
– The gap between the two electrodes of the spark plug should be 0.7 - 0.8 mm<br />
(0.028” - 0.032”). If the gap is too wide or too narrow, adjust it. If the spark<br />
plug is clogged or contaminated, clean it thoroughly or replace it.<br />
CAUTION: Never touch the spark plug connector while the engine is running<br />
(danger of high voltage electric shock).<br />
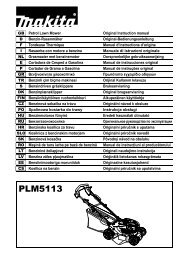
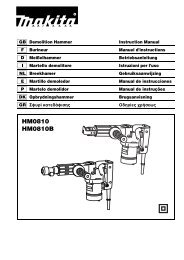
SUPPLY OF GREASE TO GEAR CASE<br />
– Supply grease (Shell Alvania 2 or equivalent) to the gear case through the<br />
grease hole every 30 hours. (Genuine MAKITA grease may be purchased<br />
from your MAKITA dealer.)<br />
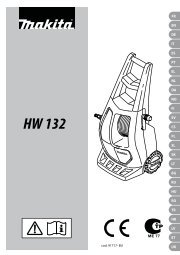
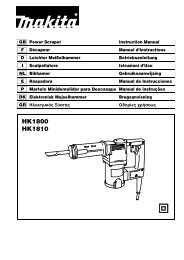
CLEANING OF FUEL FILTER<br />
WARNING: INFLAMMABLES STRICTLY PROHIBITED<br />
Interval of Cleaning and Inspection: Monthly (every 50 operating hours)<br />
Suction head in the fuel tank<br />
Check the fuel filter periodically. To check the fuel filter, follow the steps below.<br />
(1) Remove the fuel tank cap, drain the fuel to empty the tank. Check the tank<br />
inside for any foreign materials. If any, remove them.<br />
(2) Pull out the suction head by using a wire hook through the tank opening.<br />
(3) If the fuel filter clogged slightly, clean it. To clean it, gently shake and tap<br />
it in fuel. To avoid damage, do not squeeze or rub it. The fuel used for the<br />
cleaning must be disposed in accordance with the method specified by<br />
regulations in your country.<br />
If the fuel filter became hard or heavily clogged up, replace it.<br />
(4) After checking, cleaning or replacing, push the fuel filter in all the way to the<br />
bottom of the fuel tank.<br />
Clogged or damaged fuel filter can cause insufficient fuel supply and reduce<br />
engine power. Replace the fuel filter at least quarterly to ensure satisfactory fuel<br />
supply to the carburetor.<br />
REPLACEMENT OF FUEL PIPE<br />
CAUTION: INFLAMMABLES STRICTLY PROHIBITED<br />
Interval of Cleaning and Inspection: Daily (every 10 operating hours)<br />
Replacement: Annually (every 200 operating hours)<br />
Replace the fuel pipe every year, regardless of operating frequency. Fuel<br />
leakage may lead to fire.<br />
If any leakage is detected during inspection, replace the oil pipe immediately.<br />
INSPECTION OF BOLTS, NUTS AND SCREWS<br />
– Retighten loose bolts, nuts, etc.<br />
– Check for fuel and oil leakage.<br />
– Replace damaged parts with new ones for safety operation.<br />
CLEANING OF PARTS<br />
– Keep the engine always clean.<br />
– Keep the cylinder fins free of dust or dirt. Dust or dirt adhering to the fins will<br />
cause piston seizure.<br />
21<br />
0.7 mm - 0.8 mm<br />
(0.028” - 0.032”)<br />
Fuel pipe<br />
Hose clamp<br />
Fuel filter<br />
Gear case<br />
Grease hole<br />
Fuel pipe<br />
REPLACEMENT OF GASKETS AND PACKINGS<br />
In reassembling after the engine is dismounted, be sure to replace the gaskets and packings with new ones.<br />
Any maintenance of adjustment work that is not included and described in this manual is only to be performed by Authorized Service Agents.