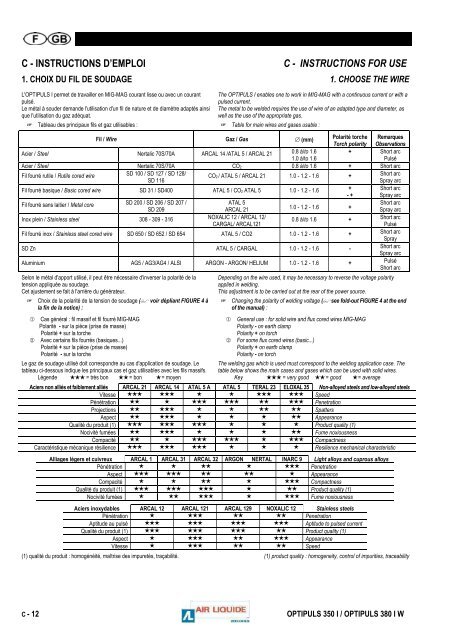
C - INSTRUCTIONS D’EMPLOI C - INSTRUCTIONS FOR USE1. CHOIX DU FIL DE SOUDAGE 1. CHOOSE THE WIREL'<strong>OPTIPULS</strong> I permet de travailler en MIG-MAG courant lisse ou avec un courantpulsé.Le métal à souder demande l'utilisation d'un fil de nature et de diamètre adaptés ainsique l'utilisation du gaz adéquat.The <strong>OPTIPULS</strong> I enables one to work in MIG-MAG with a continuous current or with apulsed current.The metal to be welded requires the use of wire of an adapted type and diameter, aswell as the use of the appropriate gas. Tableau des principaux fils et gaz utilisables : Table for main wires and gases usable :Fil / Wire Gaz / Gas ∅ (mm)Polarité torche RemarquesTorch polarity ObservationsAcier / Steel Nertalic 70S/70A ARCAL 14 /ATAL 5 / ARCAL 21 0.8 à/to 1.6+ Short arc1.0 à/to 1.6PulséAcier / Steel Nertalic 70S/70A CO2 0.8 à/to 1.6 + Short arcFil fourré rutile / Rutile cored wire SD 100 / SD 127 / SD 128/ CO2 / ATAL 5 / ARCAL 21 1.0 - 1.2 - 1.6 + Short arcSD 116Spray arcFil fourré basique / Basic cored wire SD 31 / SD400 ATAL 5 / CO2 ATAL 5 1.0 - 1.2 - 1.6 +Short arc- +Spray arcFil fourré sans laitier / Metal core SD 200 / SD 206 / SD 207 /ATAL 5Short arcSD 209ARCAL 21 1.0 - 1.2 - 1.6 +Spray arcInox plein / Stainless steel 308 - 309 - 316 NOXALIC 12 / ARCAL 12/CARGAL/ ARCAL1210.8 à/to 1.6 + Short arcPulséFil fourré inox / Stainless steel cored wire SD 650 / SD 652 / SD 654 ATAL 5 / CO2 1.0 - 1.2 - 1.6 + Short arcSpraySD Zn ATAL 5 / CARGAL 1.0 - 1.2 - 1.6 - Short arcSpray arcAluminium AG5 / AG3/AG4 / ALSI ARGON - ARGON/ HELIUM 1.0 - 1.2 - 1.6 + PulséShort arcSelon le métal d'apport utilisé, il peut être nécessaire d'inverser la polarité de latension appliquée au soudage.Cet ajustement se fait à l'arrière du générateur. Choix de la polarité de la tension de soudage ( voir dépliant FIGURE 4 àla fin de la notice) : Cas général : fil massif et fil fourré MIG-MAGPolarité - sur la pièce (prise de masse)Polarité + sur la torche Avec certains fils fourrés (basiques...)Polarité + sur la pièce (prise de masse)Polarité - sur la torcheDepending on the wire used, it may be necessary to reverse the voltage polarityapplied in welding.This adjustment is to be carried out at the rear of the power source. Changing the polarity of welding voltage (see fold-out FIGURE 4 at the endof the manual) : General use : for solid wire and flux cored wires MIG-MAGPolarity - on earth clampPolarity + on torch For some flux cored wires (basic...)Polarity + on earth clampPolarity - on torchLe gaz de soudage utilisé doit correspondre au cas d'application de soudage. Le The welding gas which is used must correspond to the welding application case. Thetableau ci-dessous indique les principaux cas et gaz utilisables avec les fils massifs. table below shows the main cases and gases which can be used with solid wires.Légende = très bon = bon = moyen Key = very good = good = averageAciers non alliés et faiblement alliés ARCAL 21 ARCAL 14 ATAL 5 A ATAL 5 TERAL 23 ELOXAL 35 Non-alloyed steels and low-alloyed steelsVitesse SpeedPénétration PenetrationProjections SpattersAspect AppearanceQualité du produit (1) Product quality (1)Nocivité fumées Fume noxiousnessCompacité CompactnessCaractéristique mécanique résilience Resilience mechanical characteristicAlliages légers et cuivreux ARCAL 1 ARCAL 31 ARCAL 32 ARGON NERTAL INARC 9 Light alloys and cuprous alloysPénétration PenetrationAspect AppearanceCompacité CompactnessQualité du produit (1) Product quality (1)Nocivité fumées Fume noxiousnessAciers inoxydables ARCAL 12 ARCAL 121 ARCAL 129 NOXALIC 12 Stainless steelsPénétration PenetrationAptitude au pulsé Aptitude to pulsed currentQualité du produit (1) Product quality (1)Aspect AppearanceVitesse Speed(1) qualité du produit : homogénéité, maîtrise des impuretés, traçabilité. (1) product quality : homogeneity, control of impurities, traceabilityC - 12<strong>OPTIPULS</strong> <strong>350</strong> I / <strong>OPTIPULS</strong> <strong>380</strong> I W
2. CHARGEMENT DE LA BOBINE DE FIL 2. CHANGING THE WIRE( voir dépliant FIGURE 5 à la fin de la notice) (see fold-out FIGURE 5 at the end of the manual)Le chargement de la bobine s'effectue comme suit (après avoir mis le générateur horstension) :Changing the reel is carried out as follows (after having turned the power supply off) :Ouvrir le cache bobineOpen the reel cover1. Dévisser l'écrou de l'axe de la bobine 1. Loosen the nut from the reel shaft2. Introduire la bobine sur l'axe 2. Put the reel on the shaft3. Revisser l'écrou sur l'axe 3. Screw the nut back on the shaft5. Abaisser les leviers pour libérer les contre-galets 5. Lower the levers in order to free the idler/backing rollers6. Introduire le fil par le guide fil d'entrée de platine 6. Insert the wire via the plate inlet wire guide7. Abaisser les contre-galets et remonter les leviers pour les immobiliser 7. Lower the idler/backing rollers and raise the levers back up in order toimmobilise them8. Ajuster la pression des contre-galets (environ –3) 8. Adjust the pressure of the idler/backing rollers (approximately –3)9. Appuyer sur le bouton poussoir d'avance rapide du fil situé sous la poignée dudévidoir, laisser dévider le fil dans la torche jusqu'à ce qu'il apparaisse au boutde celle-ci en sortie du tube contact.9. Press the wire fast advance pushbutton located under the wire-feed unithandle, let the wire feed in the torch until it appears at the end of the torch atthe tip.Si des pièces de la torche ou de la platine de dévidage doivent être adaptées à lanature de votre travail, voir le paragraphe "7. Changement des pièces d'usure" enpage 15.If torch items or wire feeding plate items have to be adapted to the kind of work you are doing,see paragraph "7. CHANGING THE WEAR " see on page 15.3. MISE EN MARCHE ET REGLAGES 3. STARTING UP AND ADJUSTMENTS Mise en marche : l'interrupteur général est situé sur la face avantdu générateur. La mise en fonctionnement se fait en basculant cetinterrupteur sur la position . Starting up : the main ON/OFF switch is located on the frontpanel of the power-source. This switch is used to start theunit up on position .4. UTILISATION DU GENERATEUR POUR LESOUDAGE A L’ELECTRODE ENROBEE4. USE OF POWER SOURCE FOR COVEREDELECTRODE WELDING( voir dépliant FIGURE 9 à la fin de la notice) (see fold-out FIGURE 9 at the end of the manual) Débrancher le câble de puissance du faisceau de dévidoir. Disconnect the power cable from the wire feed unit harness. Connecter le câble de masse et le câble de pince porte-électrode sur lesbornes de sortie de puissance du générateur. La polarité sera choisieselon le type d’électrode (voir indications sur le paquet d’électrodes). Connect the earth cable and the electrode-holder clamp cable on thepower output terminals of the power source. Polarity is to be selectedaccording to the type of electrode (see information on the electrodepacket). Choisir, sur la face avant, la position par le potentiomètre 3(figure 6 à la fin de la notice)Les autres boutons sont alors inactifs. On the front panel, select the position via potentiometer 3(Figure 6 at the end of this notice)The other buttons are then inactive.Dans ce mode, le courant de soudage est en permanence présentsur les bornes de sortie + et - du générateur.Régler l’intensité de soudage avec le bouton rouge du dévidoir en lisantla valeur sur l'afficheur supérieur.Prévoir 40A par millimètre de diamètre d’électrode pour les cas généraux.L ’afficheur supérieur indique la valeur du courant de soudage (pré-affichage),l’afficheur du bas indique la tension à vide.Puis en soudage, les indicateurs affichent les valeurs de courant et de tension desoudage.In this mode, the welding current is constantly present on thepower source + and - output terminals.Adjust the welding current with the red wire feed unit button by readingthe value on the top display-unit. Plan on 40A per millimeter of electrodediameter for general cases.The top display-unit shows the welding current adjustment value (pre-display);the bottom display-unit shows the no-load voltage.Then when welding, the indicators display the welding current and voltage values.Précision de la mesure d'intensité :± 7% ± 2APrécision de la mesure de tension :± 5% ± 0.4V5. UTILISATION DU GENERATEUR POUR LESOUDAGE MIG-MAGCurrent measurement accuracy :± 7% ± 2AVoltage measurement accuracy :± 5% ± 0.4V5. USE OF POWER SOURCE FOR MIG-MAGWELDING( voir dépliant FIGURE 6 à la fin de la notice) (see fold-out FIGURE 6 at the end of the manual) Connecter le câble de masse et le câble de puissance en fonction du typede fil choisi Connect the earth lead and the power cable according to the type of wireselected Choisir le procédé de soudage voulu avec le premier sélecteur de la faceavant : Select the required welding process with the first selector on the frontpanel : procédé MIG-MAG courant lisse pour les gaz mixtes (Argon-CO2) et FILFOURRE procédé PULSE pour les couples fil gaz FE ATAL 5 (82/18), FE ARCAL(21 ou 14), Cr ni (NOXALIC 12), Cr ni (ARCAL 12), smooth current MIG-MAG process for mixed gases (Argon-CO2) andCORED WIRE PULSE process for the gas wire pairs: FE ATAL 5 (82/18), FE ARCAL(21 or 14), Cr ni (NOXALIC 12), Cr ni (ARCAL 12,) AL mg (3 ; 5 ; 4,5),AL mg (3 ; 5 ; 4,5), AL si 5 (A5)AL si 5 (A5) Sélectionner le diamètre du fil de soudage : 0.8 mm à 1.6 mm Select the welding wire diameter : 0.8 mm to 1.6 mm<strong>OPTIPULS</strong> <strong>350</strong> I / <strong>OPTIPULS</strong> <strong>380</strong> I W C - 13