Bedienungsanleitung / Operation manual 30 MHz Digital ...
Bedienungsanleitung / Operation manual 30 MHz Digital ...
Bedienungsanleitung / Operation manual 30 MHz Digital ...

Sie wollen auch ein ePaper? Erhöhen Sie die Reichweite Ihrer Titel.
YUMPU macht aus Druck-PDFs automatisch weboptimierte ePaper, die Google liebt.
11.3. Regulate the probe attenuation.<br />
In order to match the attenuation coefficient of the probe, it is required to adjust the attenuation ration<br />
coefficient of the probe through the operating menu of the Channel accordingly (see “6. How to set the Probe<br />
Attenation Coefficient” on page 100). If the attenuation coefficient of the probe is 1:1, that of the oscilloscope<br />
input channel should also be set to X1 to avoid any errors presented in the displayed scale factor information<br />
and the measured data.<br />
Take the Channel 1 as an example, the attenuation coefficient of the probe is 10:1, the operation steps is<br />
shown as follows:<br />
* Press the CH1 MENU button, access CH1 SETUP menu.<br />
* Press the H3 menu selection, the Probe menu will display at the right of the screen, then press the F2<br />
button to select X10 for the probe.<br />
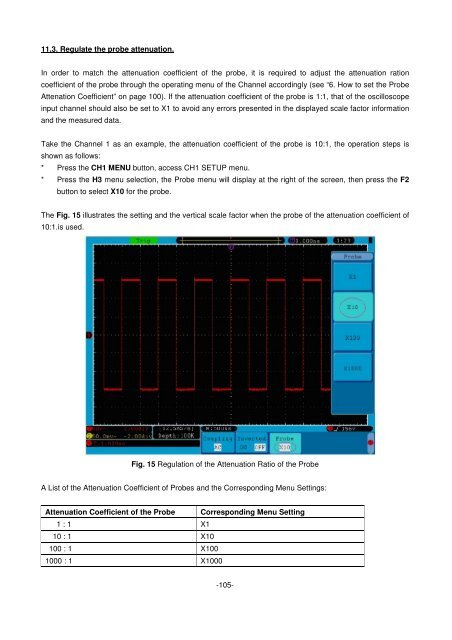
The Fig. 15 illustrates the setting and the vertical scale factor when the probe of the attenuation coefficient of<br />
10:1.is used.<br />
Fig. 15 Regulation of the Attenuation Ratio of the Probe<br />
A List of the Attenuation Coefficient of Probes and the Corresponding Menu Settings:<br />
Attenuation Coefficient of the Probe Corresponding Menu Setting<br />
1 : 1 X1<br />
10 : 1 X10<br />
100 : 1 X100<br />
1000 : 1 X1000<br />
-105-