- Seite 1 und 2:
PeakTech ® 1265 Bedienungsanleitun
- Seite 3 und 4:
* Warnung!: Ist das Oszilloskop mit
- Seite 5 und 6:
Abb. 1 1. Ein/Aus- Schalter 2. Anze
- Seite 7 und 8:
3.4. Rückseite Abb. 3 Rückseite d
- Seite 9 und 10:
3.6. Einführung in die Benutzerobe
- Seite 11 und 12:
2. Überprüfen des Zubehörs Das m
- Seite 13 und 14:
3. Wiederholen Sie die Schritte, fa
- Seite 15 und 16:
2. Ändern Sie die Vertikaleinstell
- Seite 17 und 18:
11. Einstellung des vertikalen Syst
- Seite 19 und 20:
Abb. 14 Oszillogramm der Wechselstr
- Seite 21 und 22:
Abb. 16 Wellenform nicht invertiert
- Seite 23 und 24:
Gehen Sie wie folgt vor, um z.B. ei
- Seite 25 und 26:
Typ Beschreibung Fenster Rechteck (
- Seite 27 und 28:
Abb. 23 Blackman-Fenster Schnelltip
- Seite 29 und 30:
Abb. 25 Menü Time Mode Das Horizon
- Seite 31 und 32:
19. Einstellen des Triggersystems D
- Seite 33 und 34:
2. Video Wählen Sie den Video-Modu
- Seite 35 und 36:
Das Pulse-Menü: Menü Einstellunge
- Seite 37 und 38:
7. Alternierender Trigger (Triggerm
- Seite 39 und 40:
Das Alternierender Trigger (ALT) (T
- Seite 41 und 42:
20. Einrichten der Abtastfunktion D
- Seite 43 und 44:
21. Einstellung des Anzeigesystems
- Seite 45 und 46:
22. Nachleuchten Mit der Funktion P
- Seite 47 und 48:
25. VGA-Ausgang Am VGA-Ausgang kann
- Seite 49 und 50:
Abb. 47 Tipp: Wenn im Speichermenü
- Seite 51 und 52:
Hinweis: Sowohl die Wellenformen vo
- Seite 53 und 54:
So verwenden Sie die Wellenform-Auf
- Seite 55 und 56:
Das Adjust-Menü: Funktionsmenü Ei
- Seite 57 und 58:
6. Regel speichern: Drücken Sie zu
- Seite 59 und 60:
Abb. 60 Einstellen der Netzwerkpara
- Seite 61 und 62:
Abb. 63 Einstellen der Netzwerkpara
- Seite 63 und 64:
Abb. 66 Menü Messungen Das "Automa
- Seite 65 und 66:
30. Automatische Messung der Spannu
- Seite 67 und 68:
Bei Messungen mit dem Cursor könne
- Seite 69 und 70:
Das Curs Meas-Menü: Funktionsmenü
- Seite 71 und 72:
33. Verwenden der Autoscale-Funktio
- Seite 73 und 74:
Verwenden der integrierten Hilfe 1.
- Seite 75 und 76:
2. Automatische Messung durchführe
- Seite 77 und 78:
35.3. Beispiel 3: Aufzeichnen eines
- Seite 79 und 80:
Abb. 81 Signal mit Rauschen Signal
- Seite 81 und 82:
Auf Grundlage des Ausdrucks sin(q)
- Seite 83 und 84:
37. Technische Daten Soweit nicht a
- Seite 85 und 86:
A/D - Wandler Empfindlichkeit 8 bit
- Seite 87 und 88:
38. Lieferumfang Standardzubehör:
- Seite 89 und 90:
1. Safety Precautions This product
- Seite 91 und 92:
3. General Characteristics * Bandwi
- Seite 93 und 94:
3.3. Right side panel 1. 2. 3. 4. F
- Seite 95 und 96:
3.5. Control (key and knob) area Fi
- Seite 97 und 98:
16. The frequency of the trigger si
- Seite 99 und 100:
Fig. 6 Auto set Check CH2 by repeat
- Seite 101 und 102:
7. How to Implement Self-calibratio
- Seite 103 und 104:
2. Use the “HORIZONTAL POSITION
- Seite 105 und 106:
The description of the Channel Menu
- Seite 107 und 108: 11.4. Setting of Waveform Inverted
- Seite 109 und 110: The corresponding FCL (Functional C
- Seite 111 und 112: Hamming Hanning Blackman This is a
- Seite 113 und 114: 13.2. Notes for using FFT * If desi
- Seite 115 und 116: 16. Main Time Base Press the H1 men
- Seite 117 und 118: 19.1. Trigger Control The oscillosc
- Seite 119 und 120: Sync Mode Holdoff Line Field Odd Ev
- Seite 121 und 122: 6. Alternate trigger (Trigger mode:
- Seite 123 und 124: 9. Alternate trigger (Trigger Mode:
- Seite 125 und 126: 20. How to Implement Sampling Setup
- Seite 127 und 128: 21. How to Set the Display System P
- Seite 129 und 130: 23. XY Format This format is only a
- Seite 131 und 132: The description of the Save Functio
- Seite 133 und 134: 2. After the USB disk is installed,
- Seite 135 und 136: Playback: Play back the wave record
- Seite 137 und 138: The description of Configuration Me
- Seite 139 und 140: Function Menu Setting Description o
- Seite 141 und 142: 27.2.6. LAN Set Using the LAN port,
- Seite 143 und 144: Set the network parameters of the o
- Seite 145 und 146: Set the network parameters of the o
- Seite 147 und 148: 29. Measure The measured values can
- Seite 149 und 150: 30.1. The automatic measurement of
- Seite 151 und 152: Carry out the following operation s
- Seite 153 und 154: Fig. 74 wave of Vamp cursor measure
- Seite 155 und 156: Then the wave is displayed in the s
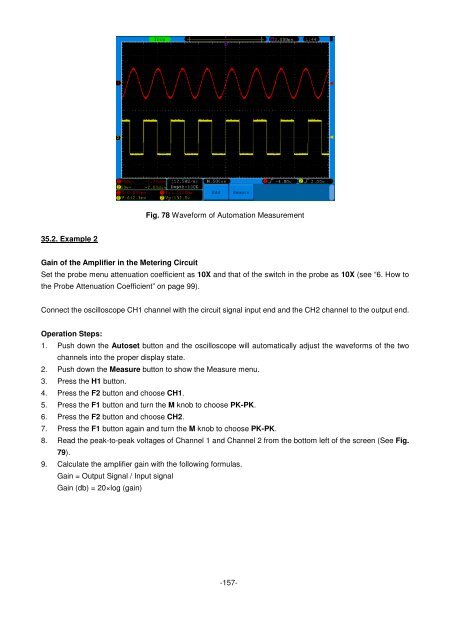
- Seite 157: 34.4. Copy This button is the short
- Seite 161 und 162: Fig. 81 Waveform of the Signal Cont
- Seite 163 und 164: 35.6. Example 6: Video Signal Trigg
- Seite 165 und 166: 37. Technical Specifications Unless
- Seite 167 und 168: Measurement Cursor Automatic Wavefo
- Seite 169 und 170: 38. Appendix 38.1. Appendix A: Encl