Bedienungsanleitung / Operation manual 30 MHz Digital ...
Bedienungsanleitung / Operation manual 30 MHz Digital ...
Bedienungsanleitung / Operation manual 30 MHz Digital ...

Erfolgreiche ePaper selbst erstellen
Machen Sie aus Ihren PDF Publikationen ein blätterbares Flipbook mit unserer einzigartigen Google optimierten e-Paper Software.
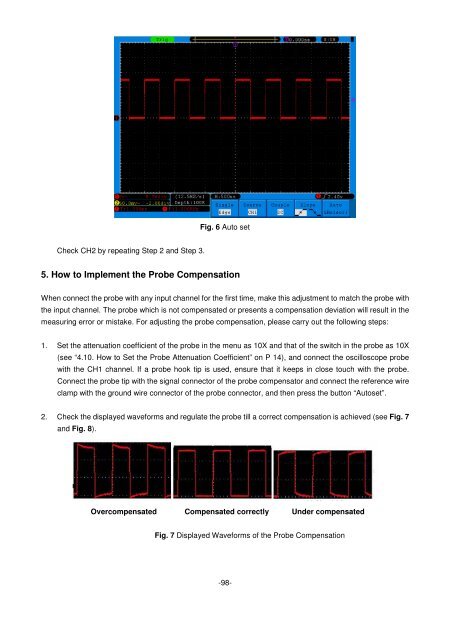
Fig. 6 Auto set<br />
Check CH2 by repeating Step 2 and Step 3.<br />
5. How to Implement the Probe Compensation<br />
When connect the probe with any input channel for the first time, make this adjustment to match the probe with<br />
the input channel. The probe which is not compensated or presents a compensation deviation will result in the<br />
measuring error or mistake. For adjusting the probe compensation, please carry out the following steps:<br />
1. Set the attenuation coefficient of the probe in the menu as 10X and that of the switch in the probe as 10X<br />
(see “4.10. How to Set the Probe Attenuation Coefficient” on P 14), and connect the oscilloscope probe<br />
with the CH1 channel. If a probe hook tip is used, ensure that it keeps in close touch with the probe.<br />
Connect the probe tip with the signal connector of the probe compensator and connect the reference wire<br />
clamp with the ground wire connector of the probe connector, and then press the button “Autoset”.<br />
2. Check the displayed waveforms and regulate the probe till a correct compensation is achieved (see Fig. 7<br />
and Fig. 8).<br />
Overcompensated Compensated correctly Under compensated<br />
Fig. 7 Displayed Waveforms of the Probe Compensation<br />
-98-