- Page 1 and 2:
SERVICE SERVICE MANUAL MANUAL FOR F
- Page 3 and 4: Contents 8599 N/B Maintenance 6. Sy
- Page 5 and 6: 8599 N/B Maintenance 1. Hardware En
- Page 7 and 8: 1.1.2 System Overview (3) Continue
- Page 9 and 10: Intel Pentium 4 Processor Product F
- Page 11 and 12: 8599 N/B Maintenance 256-bit data
- Page 13 and 14: 8599 N/B Maintenance The SiSM661FX
- Page 15 and 16: 8599 N/B Maintenance - Supports zer
- Page 17 and 18: 8599 N/B Maintenance -- Built-in 32
- Page 19 and 20: 8599 N/B Maintenance -- Built-in 25
- Page 21 and 22: 8599 N/B Maintenance -- 16 color-ke
- Page 23 and 24: 1.2.3 SiS963L MuTIOL 1G Media I/O 8
- Page 25 and 26: Features : Meet PC2001 Requirements
- Page 27 and 28: 8599 N/B Maintenance - Supports wak
- Page 29 and 30: 8599 N/B Maintenance - Support PCI
- Page 31 and 32: 1.2.4 Memory Table 2. Memory Expans
- Page 33 and 34: USB Ports - Six industry standard U
- Page 35 and 36: 1.2.6 PC Card Slot 8599 N/B Mainten
- Page 37 and 38: 1.2.12 Keyboard Controller Winboard
- Page 39 and 40: 1.3.2 Power Off Sequence CPU 8599 N
- Page 41 and 42: 8599 N/B Maintenance 1.3.4 Resume f
- Page 43 and 44: 8599 N/B Maintenance 1.4 Appendix 1
- Page 45 and 46: 8599 N/B Maintenance 1.5 Appendix 2
- Page 47 and 48: 2. System View and Disassembly 2.1
- Page 49 and 50: 2.1.5 Bottom View 1 Wireless Card c
- Page 51 and 52: 2.2.1 Battery Pack Disassembly 8599
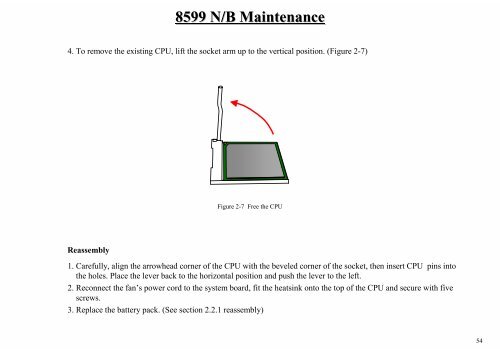
- Page 53: Reassembly 8599 N/B Maintenance 4.
- Page 57 and 58: 2.2.5 CD/DVD-ROM Drive Disassembly
- Page 59 and 60: 2.2.7 Modem Card Disassembly Figure
- Page 61 and 62: 2.2.8 LCD ASSY Disassembly 8599 N/B
- Page 63 and 64: 2.2.9 Inverter Board Disassembly 85
- Page 65 and 66: 2.2.10 LCD Panel Disassembly 8599 N
- Page 67 and 68: 2.2.11 System Board Disassembly 859
- Page 69 and 70: 2.2.12 Touch Pad Disassembly 8599 N
- Page 71 and 72: 8599 N/B Maintenance 3. Definition
- Page 73 and 74: 8599 N/B Maintenance 4. Definition
- Page 75 and 76: HIT# 8599 N/B Maintenance 5.1 Intel
- Page 77 and 78: Name Type Description REQ[4:0]# Inp
- Page 79 and 80: 8599 N/B Maintenance 5.2 SiS M661FX
- Page 81 and 82: 8599 N/B Maintenance 5.2 SiS M661FX
- Page 83 and 84: 8599 N/B Maintenance 5.2 SiS M661FX
- Page 85 and 86: 8599 N/B Maintenance 5.3 SiS963L(Mu
- Page 87 and 88: 8599 N/B Maintenance 5.3 SiS963L(Mu
- Page 89 and 90: 8599 N/B Maintenance 5.3 SiS963L(Mu
- Page 91 and 92: 7. Maintenance Diagnostics 7.1 Intr
- Page 93 and 94: 7.2 Error Codes (2) Code 30h 31h 32
- Page 95 and 96: 8. Trouble Shooting 8.1 No Power (*
- Page 97 and 98: P23 PF1,PL1,PL2 PL6,PD4 PD1,PD3 P23
- Page 99 and 100: 8599 8599 N/B Maintenance N/B Maint
- Page 101 and 102: ADINP_1 ADINP_2 ADINP P20 PR156 0 C
- Page 103 and 104: P4 P6 U6 P4 CPU PGA487 U12 SiS M661
- Page 105 and 106:
P4 U6 CPU Pentium4 P20 U17 KBC W83L
- Page 107 and 108:
U20 SiS963L SB U12 SiS M661FX NB LC
- Page 109 and 110:
8599 N/B Maintenance 8.5 External M
- Page 111 and 112:
8.6 TV Test Error (2) There is no d
- Page 113 and 114:
P6 U12 SiS M661FX NB 8.7 Memory Tes
- Page 115 and 116:
C195 22P X3 14.31818MHz 8599 N/B Ma
- Page 117 and 118:
8.9 Hard Drive Test Error (2) 8599
- Page 119 and 120:
8.10 CD-ROM Drive Test Error (2) 85
- Page 121 and 122:
P11 8.11 USB Port Test Error (2) U1
- Page 123 and 124:
P11 8.11 USB Port Test Error (4) U1
- Page 125 and 126:
8.12 PC Card Socket Test Error (2)
- Page 127 and 128:
8.13 Mini-PCI Socket Test Error (2)
- Page 129 and 130:
P16 P13 U20 SIS963L SB U22 PCMCIA T
- Page 131 and 132:
8.15 LAN Test Error (1) An error oc
- Page 133 and 134:
9. Spare Parts List Spare Part List
- Page 135 and 136:
9. Spare Parts List Spare Part List
- Page 137 and 138:
9. Spare Parts List Spare Part List
- Page 139 and 140:
9. Spare Parts List Spare Part List
- Page 141 and 142:
9. Spare Parts List Spare Part List
- Page 143:
9. Spare Parts List Spare Part List
- Page 146 and 147:
8 8 7 8599 SYSTEM BLOCK DIAGRAM 7 6
- Page 148 and 149:
8 Prescott/Northwood (1/2) 8 7 7 6
- Page 150 and 151:
8 8 7 7 6 6 5 5 4 4 3 3 2 2 1 1 D D
- Page 152 and 153:
8 8 7 TV/LVDS ENCODER (SIS301LV) 7
- Page 155 and 156:
8 Clock Generator/Buffer 7 6 5 * IN
- Page 157 and 158:
8 SIS963L (2/3) 8 7 7 6 6 5 D [4,18
- Page 160:
8 8 7 7 6 6 5 5 4 4 3 3 2 2 1 1 D D
- Page 165 and 166:
8 Mini-PCI & USB 2.0 8 +5VS 1 A2 R3
- Page 167 and 168:
8 8 7 7 6 6 5 D D BAV70LT1 ADINP JO
- Page 169 and 170:
8 8 7 7 6 6 5 5 4 4 3 3 2 2 1 1 D D
- Page 171 and 172:
8 8 7 7 6 6 5 CPU_CORE (1/2) +5VS D
- Page 173 and 174:
Reference Material Intel Pentium 4