

mitac 8599.pdf - tim.id.au
mitac 8599.pdf - tim.id.au
mitac 8599.pdf - tim.id.au

You also want an ePaper? Increase the reach of your titles
YUMPU automatically turns print PDFs into web optimized ePapers that Google loves.
8599 N/B Maintenance<br />
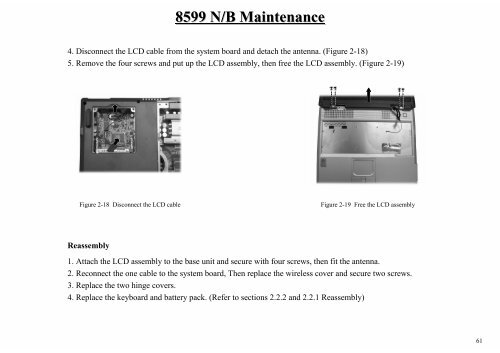
4. Disconnect the LCD cable from the system board and detach the antenna. (Figure 2-18)<br />
5. Remove the four screws and put up the LCD assembly, then free the LCD assembly. (Figure 2-19)<br />
Figure 2-18 Disconnect the LCD cable<br />
Reassembly<br />
Figure 2-19 Free the LCD assembly<br />
1. Attach the LCD assembly to the base unit and secure with four screws, then fit the antenna.<br />
2. Reconnect the one cable to the system board, Then replace the wireless cover and secure two screws.<br />
3. Replace the two hinge covers.<br />
4. Replace the keyboard and battery pack. (Refer to sections 2.2.2 and 2.2.1 Reassembly)<br />
61


