

Wooden Boat Restoration Repair - WEST SYSTEM Epoxy
Wooden Boat Restoration Repair - WEST SYSTEM Epoxy
Wooden Boat Restoration Repair - WEST SYSTEM Epoxy

You also want an ePaper? Increase the reach of your titles
YUMPU automatically turns print PDFs into web optimized ePapers that Google loves.
3.1.1 Filling with epoxy<br />
3.1.2 Filling with wood<br />
<strong>Repair</strong>ing Localized Dry Rot 14<br />
Small cavities are most conveniently filled with solid thickened epoxy as follows:<br />
1. Prepare the surface (Section 8.4.1). Be sure the area is thoroughly dry.<br />
2. Wet out the repair area with the resin/hardener mixture (see Two-step bonding, page<br />
65).<br />
3. Fill the cavity with epoxy thickened with a high-density (406,404 or 403) filler to a<br />
peanut butter consistency. Trowel the mixture into the void with a plastic spreader or<br />
mixing stick (Figure 3-2). Smooth the mixture flush with the surface and remove any<br />
excess before the mixture begins to cure.<br />
4. Allow the mixture to cure thoroughly before sanding.<br />
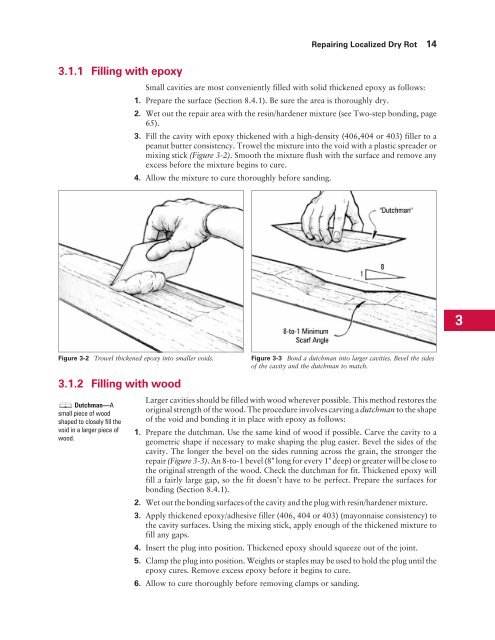
Figure 3-2 Trowel thickened epoxy into smaller voids. Figure 3-3 Bond a dutchman into larger cavities. Bevel the sides<br />
of the cavity and the dutchman to match.<br />
Dutchman—A<br />
small piece of wood<br />
shaped to closely fill the<br />
void in a larger piece of<br />
wood.<br />
Larger cavities should be filled with wood wherever possible. This method restores the<br />
original strength of the wood. The procedure involves carving a dutchman to the shape<br />
of the void and bonding it in place with epoxy as follows:<br />
1. Prepare the dutchman. Use the same kind of wood if possible. Carve the cavity to a<br />
geometric shape if necessary to make shaping the plug easier. Bevel the sides of the<br />
cavity. The longer the bevel on the sides running across the grain, the stronger the<br />
repair (Figure 3-3). An 8-to-1 bevel (8" long for every 1" deep) or greater will be close to<br />
the original strength of the wood. Check the dutchman for fit. Thickened epoxy will<br />
fill a fairly large gap, so the fit doesn’t have to be perfect. Prepare the surfaces for<br />
bonding (Section 8.4.1).<br />
2. Wet out the bonding surfaces of the cavity and the plug with resin/hardener mixture.<br />
3. Apply thickened epoxy/adhesive filler (406, 404 or 403) (mayonnaise consistency) to<br />
the cavity surfaces. Using the mixing stick, apply enough of the thickened mixture to<br />
fill any gaps.<br />
4. Insert the plug into position. Thickened epoxy should squeeze out of the joint.<br />
5. Clamp the plug into position. Weights or staples may be used to hold the plug until the<br />
epoxy cures. Remove excess epoxy before it begins to cure.<br />
6. Allow to cure thoroughly before removing clamps or sanding.<br />
3


