

Wooden Boat Restoration Repair - WEST SYSTEM Epoxy
Wooden Boat Restoration Repair - WEST SYSTEM Epoxy
Wooden Boat Restoration Repair - WEST SYSTEM Epoxy

Create successful ePaper yourself
Turn your PDF publications into a flip-book with our unique Google optimized e-Paper software.
4.1.1 Laminating in a jig<br />
springback in the curved frame. Using more, thinner strips results in a curved frame<br />
with greater strength and less springback, but requires more labor and epoxy to build.<br />
Use thinner strips especially with harder woods like white oak.<br />
3. Use full-length strips. Make the strips longer than the finished frame to allow for<br />
trimming.<br />
4. The new frame width should be the same as the original frame. Strips can be wider to<br />
allow for trimming and finishing after the frame is laid up.<br />
5. Select wood strips that are seasoned. Ideal moisture content is 6% to 14%.<br />
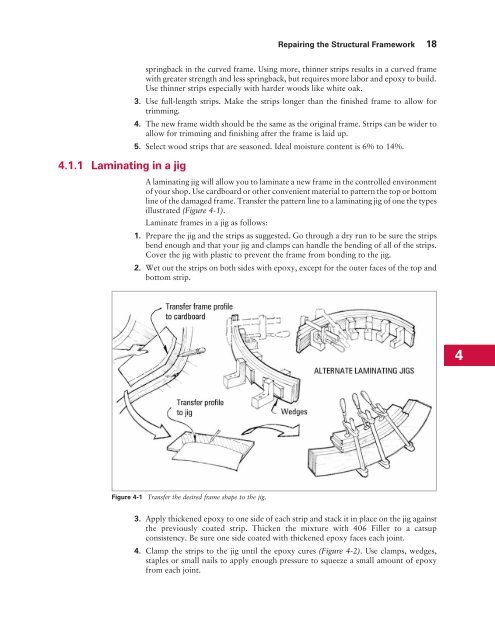
A laminating jig will allow you to laminate a new frame in the controlled environment<br />
of your shop. Use cardboard or other convenient material to pattern the top or bottom<br />
line of the damaged frame. Transfer the pattern line to a laminating jig of one the types<br />
illustrated (Figure 4-1).<br />
Laminate frames in a jig as follows:<br />
1. Prepare the jig and the strips as suggested. Go through a dry run to be sure the strips<br />
bend enough and that your jig and clamps can handle the bending of all of the strips.<br />
Cover the jig with plastic to prevent the frame from bonding to the jig.<br />
2. Wet out the strips on both sides with epoxy, except for the outer faces of the top and<br />
bottom strip.<br />
Figure 4-1 Transfer the desired frame shape to the jig.<br />
<strong>Repair</strong>ing the Structural Framework 18<br />
3. Apply thickened epoxy to one side of each strip and stack it in place on the jig against<br />
the previously coated strip. Thicken the mixture with 406 Filler to a catsup<br />
consistency. Be sure one side coated with thickened epoxy faces each joint.<br />
4. Clamp the strips to the jig until the epoxy cures (Figure 4-2). Use clamps, wedges,<br />
staples or small nails to apply enough pressure to squeeze a small amount of epoxy<br />
from each joint.<br />
4


