

Wooden Boat Restoration Repair - WEST SYSTEM Epoxy
Wooden Boat Restoration Repair - WEST SYSTEM Epoxy
Wooden Boat Restoration Repair - WEST SYSTEM Epoxy

Create successful ePaper yourself
Turn your PDF publications into a flip-book with our unique Google optimized e-Paper software.
8.4.5 Applying woven cloth and tape<br />
Fiberglass cloth is applied to surfaces to provide reinforcement and/or abrasion resistance,<br />
or in the case of Douglas Fir plywood, to prevent grain checking. It is usually applied<br />
after fairing and shaping are completed, and before the final coating operation. It<br />
is also applied in multiple layers (laminated) and in combination with other materials<br />
to build composite parts.<br />
Fiberglass cloth may be applied to surfaces by either of two methods. The “dry”<br />
method refers to applying the cloth over a dry surface. The “wet” method refers to applying<br />
the cloth to an epoxy-coated surface often after the wet-out coat becomes tacky,<br />
which helps it cling to vertical or overhead surfaces. Since this method makes it more<br />
difficult to position the cloth, the dry method is the preferred method especially with<br />
thinner cloth.<br />
Dry method<br />
1. Prepare the surface as you would for bonding (Section 8.4.1).<br />
2. Position the cloth over the surface and cut it several inches larger on all sides. If the surface<br />
area you are covering is larger than the cloth size, allow multiple pieces to overlap<br />
by approximately two inches. On sloped or vertical surfaces, hold the cloth in place<br />
with masking or duct tape, or with staples.<br />
3. Mix a small quantity of epoxy (three or four pumps each of resin and hardener).<br />
4. Pour a small pool of resin/hardener near the center of the cloth.<br />
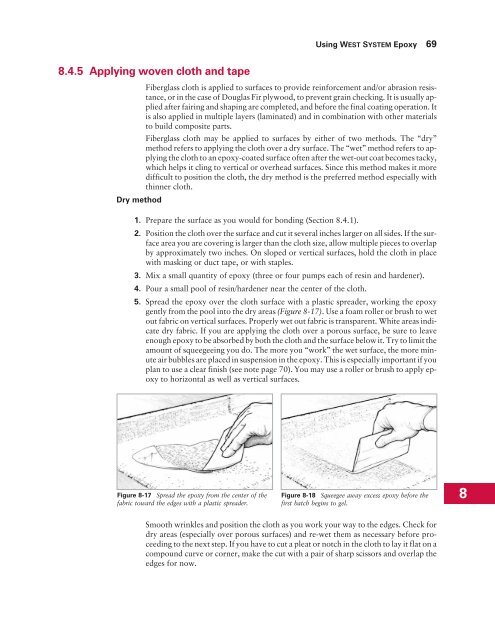
5. Spread the epoxy over the cloth surface with a plastic spreader, working the epoxy<br />
gently from the pool into the dry areas (Figure 8-17). Use a foam roller or brush to wet<br />
out fabric on vertical surfaces. Properly wet out fabric is transparent. White areas indicate<br />
dry fabric. If you are applying the cloth over a porous surface, be sure to leave<br />
enough epoxy to be absorbed by both the cloth and the surface below it. Try to limit the<br />
amount of squeegeeing you do. The more you “work” the wet surface, the more minute<br />
air bubbles are placed in suspension in the epoxy. This is especially important if you<br />
plan to use a clear finish (see note page 70). You may use a roller or brush to apply epoxy<br />
to horizontal as well as vertical surfaces.<br />
Figure 8-17 Spread the epoxy from the center of the<br />
fabric toward the edges with a plastic spreader.<br />
Using <strong>WEST</strong> <strong>SYSTEM</strong> <strong>Epoxy</strong> 69<br />
Figure 8-18 Squeegee away excess epoxy before the<br />
first batch begins to gel.<br />
Smooth wrinkles and position the cloth as you work your way to the edges. Check for<br />
dry areas (especially over porous surfaces) and re-wet them as necessary before proceeding<br />
to the next step. If you have to cut a pleat or notch in the cloth to lay it flat on a<br />
compound curve or corner, make the cut with a pair of sharp scissors and overlap the<br />
edges for now.<br />
8


