

Wooden Boat Restoration Repair - WEST SYSTEM Epoxy
Wooden Boat Restoration Repair - WEST SYSTEM Epoxy
Wooden Boat Restoration Repair - WEST SYSTEM Epoxy

Create successful ePaper yourself
Turn your PDF publications into a flip-book with our unique Google optimized e-Paper software.
8.3 Handling epoxy<br />
This section explains the fundamentals of epoxy curing and the steps for proper dispensing,<br />
mixing, and adding fillers to assure that every batch of epoxy cures to a useful<br />
high-strength solid.<br />
8.3.1 Understanding epoxy’s cure stages<br />
Mixing epoxy resin and hardener begins a chemical reaction that transforms the combined<br />
liquid ingredients to a solid. The time it takes for this transformation is the cure<br />
time. As it cures the epoxy passes from the liquid state, through a gel state, before it<br />
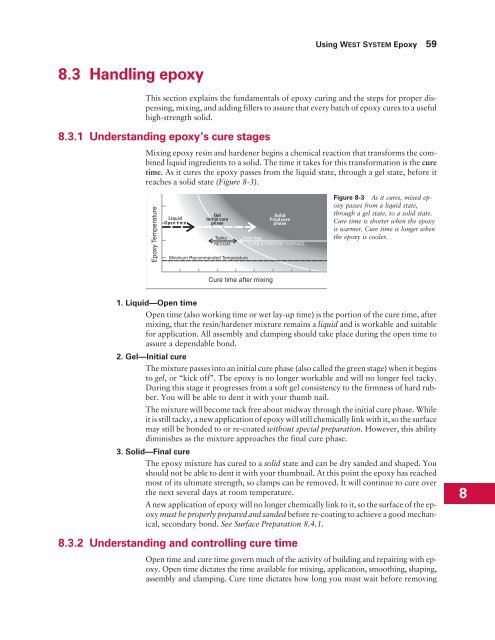
reaches a solid state (Figure 8-3).<br />
<strong>Epoxy</strong> Temperature<br />
Liquid<br />
Open time<br />
Gel<br />
Initial cure<br />
phase<br />
Minimum Recommended Temperature<br />
Cure time after mixing<br />
Solid<br />
Finalcure<br />
phase<br />
Tacky Tack free<br />
RECOAT CURE & PREPARE SURFACE<br />
1. Liquid—Open time<br />
Open time (also working time or wet lay-up time) is the portion of the cure time, after<br />
mixing, that the resin/hardener mixture remains a liquid and is workable and suitable<br />
for application. All assembly and clamping should take place during the open time to<br />
assure a dependable bond.<br />
2. Gel—Initial cure<br />
The mixture passes into an initial cure phase (also called the green stage) when it begins<br />
to gel, or “kick off”. The epoxy is no longer workable and will no longer feel tacky.<br />
During this stage it progresses from a soft gel consistency to the firmness of hard rubber.<br />
You will be able to dent it with your thumb nail.<br />
The mixture will become tack free about midway through the initial cure phase. While<br />
it is still tacky, a new application of epoxy will still chemically link with it, so the surface<br />
may still be bonded to or re-coated without special preparation. However, this ability<br />
diminishes as the mixture approaches the final cure phase.<br />
3. Solid—Final cure<br />
The epoxy mixture has cured to a solid state and can be dry sanded and shaped. You<br />
should not be able to dent it with your thumbnail. At this point the epoxy has reached<br />
most of its ultimate strength, so clamps can be removed. It will continue to cure over<br />
the next several days at room temperature.<br />
A new application of epoxy will no longer chemically link to it, so the surface of the epoxy<br />
must be properly prepared and sanded before re-coating to achieve a good mechanical,<br />
secondary bond. See Surface Preparation 8.4.1.<br />
8.3.2 Understanding and controlling cure time<br />
Using <strong>WEST</strong> <strong>SYSTEM</strong> <strong>Epoxy</strong> 59<br />
Figure 8-3 As it cures, mixed epoxy<br />
passes from a liquid state,<br />
through a gel state, to a solid state.<br />
Cure time is shorter when the epoxy<br />
is warmer. Cure time is longer when<br />
the epoxy is cooler.<br />
Open time and cure time govern much of the activity of building and repairing with epoxy.<br />
Open time dictates the time available for mixing, application, smoothing, shaping,<br />
assembly and clamping. Cure time dictates how long you must wait before removing<br />
8


