

Wooden Boat Restoration Repair - WEST SYSTEM Epoxy
Wooden Boat Restoration Repair - WEST SYSTEM Epoxy
Wooden Boat Restoration Repair - WEST SYSTEM Epoxy

Create successful ePaper yourself
Turn your PDF publications into a flip-book with our unique Google optimized e-Paper software.
Place new layers ½" to either side of the previous layer so the edges don’t fall directly<br />
on top each other. For details on applying fiberglass cloth, see Section 8.4.5.<br />
7. Apply thickened epoxy/407 or 410 low-density filler (peanut butter consistency) to the<br />
joint. Use a plastic spreader to trowel on and shape the thickened mixture slightly<br />
higher than the plywood surface (Section 8.4.4). Allow to cure thoroughly and sand<br />
fair.<br />
5.3.2 Replacing damaged plywood sections.<br />
Sections of plywood panels may suffer from impact or dry rot damage and can be<br />
repaired without replacing the whole panel. The damaged section can be cut out and a<br />
replacement section bonded in without losing any panel strength. Replace small<br />
plywood panel sections as follows:<br />
1. Cut the damaged section out of the panel. Use a circular saw or reciprocating saw to cut<br />
the smallest square or rectangle that encloses all of the damage. Check the extent of<br />
damage on the interior of the panel.<br />
2. Scarf or step the edges of the opening.<br />
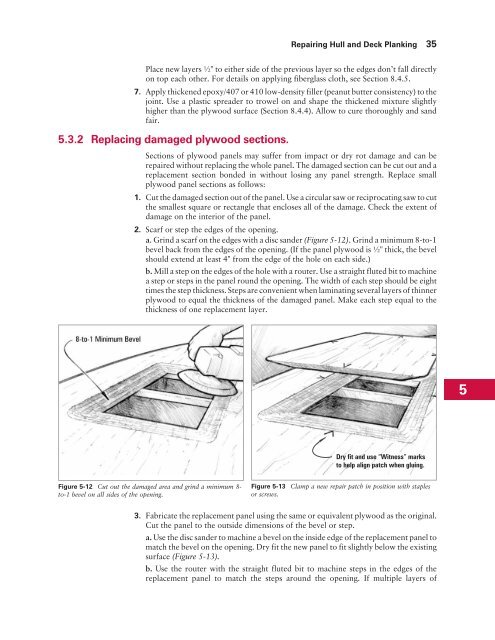
a. Grind a scarf on the edges with a disc sander (Figure 5-12). Grind a minimum 8-to-1<br />
bevel back from the edges of the opening. (If the panel plywood is ½" thick, the bevel<br />
should extend at least 4" from the edge of the hole on each side.)<br />
b. Mill a step on the edges of the hole with a router. Use a straight fluted bit to machine<br />
a step or steps in the panel round the opening. The width of each step should be eight<br />
times the step thickness. Steps are convenient when laminating several layers of thinner<br />
plywood to equal the thickness of the damaged panel. Make each step equal to the<br />
thickness of one replacement layer.<br />
Figure 5-12 Cut out the damaged area and grind a minimum 8to-1<br />
bevel on all sides of the opening.<br />
<strong>Repair</strong>ing Hull and Deck Planking 35<br />
Dry fit and use “Witness” marks<br />
to help align patch when gluing.<br />
Figure 5-13 Clamp a new repair patch in position with staples<br />
or screws.<br />
3. Fabricate the replacement panel using the same or equivalent plywood as the original.<br />
Cut the panel to the outside dimensions of the bevel or step.<br />
a. Use the disc sander to machine a bevel on the inside edge of the replacement panel to<br />
match the bevel on the opening. Dry fit the new panel to fit slightly below the existing<br />
surface (Figure 5-13).<br />
b. Use the router with the straight fluted bit to machine steps in the edges of the<br />
replacement panel to match the steps around the opening. If multiple layers of<br />
5


