

Wooden Boat Restoration Repair - WEST SYSTEM Epoxy
Wooden Boat Restoration Repair - WEST SYSTEM Epoxy
Wooden Boat Restoration Repair - WEST SYSTEM Epoxy

You also want an ePaper? Increase the reach of your titles
YUMPU automatically turns print PDFs into web optimized ePapers that Google loves.
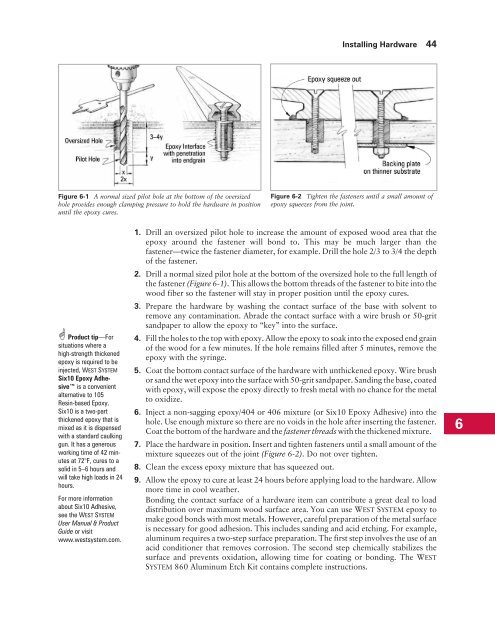
Figure 6-1 A normal sized pilot hole at the bottom of the oversized<br />
hole provides enough clamping pressure to hold the hardware in position<br />
until the epoxy cures.<br />
Product tip—For<br />
situations where a<br />
high-strength thickened<br />
epoxy is required to be<br />
injected, <strong>WEST</strong> <strong>SYSTEM</strong><br />
Six10 <strong>Epoxy</strong> Adhesive<br />
is a convenient<br />
alternative to 105<br />
Resin-based <strong>Epoxy</strong>.<br />
Six10 is a two-part<br />
thickened epoxy that is<br />
mixed as it is dispensed<br />
with a standard caulking<br />
gun. It has a generous<br />
working time of 42 minutes<br />
at 72°F, cures to a<br />
solid in 5–6 hours and<br />
will take high loads in 24<br />
hours.<br />
For more information<br />
about Six10 Adhesive,<br />
see the <strong>WEST</strong> <strong>SYSTEM</strong><br />
User Manual & Product<br />
Guide or visit<br />
www.westsystem.com.<br />
Installing Hardware 44<br />
Figure 6-2 Tighten the fasteners until a small amount of<br />
epoxy squeezes from the joint.<br />
1. Drill an oversized pilot hole to increase the amount of exposed wood area that the<br />
epoxy around the fastener will bond to. This may be much larger than the<br />
fastener—twice the fastener diameter, for example. Drill the hole 2/3 to 3/4 the depth<br />
of the fastener.<br />
2. Drill a normal sized pilot hole at the bottom of the oversized hole to the full length of<br />
the fastener (Figure 6-1). This allows the bottom threads of the fastener to bite into the<br />
wood fiber so the fastener will stay in proper position until the epoxy cures.<br />
3. Prepare the hardware by washing the contact surface of the base with solvent to<br />
remove any contamination. Abrade the contact surface with a wire brush or 50-grit<br />
sandpaper to allow the epoxy to “key” into the surface.<br />
4. Fill the holes to the top with epoxy. Allow the epoxy to soak into the exposed end grain<br />
of the wood for a few minutes. If the hole remains filled after 5 minutes, remove the<br />
epoxy with the syringe.<br />
5. Coat the bottom contact surface of the hardware with unthickened epoxy. Wire brush<br />
or sand the wet epoxy into the surface with 50-grit sandpaper. Sanding the base, coated<br />
with epoxy, will expose the epoxy directly to fresh metal with no chance for the metal<br />
to oxidize.<br />
6. Inject a non-sagging epoxy/404 or 406 mixture (or Six10 <strong>Epoxy</strong> Adhesive) into the<br />
hole. Use enough mixture so there are no voids in the hole after inserting the fastener.<br />
Coat the bottom of the hardware and the fastener threads with the thickened mixture.<br />
7. Place the hardware in position. Insert and tighten fasteners until a small amount of the<br />
mixture squeezes out of the joint (Figure 6-2). Do not over tighten.<br />
8. Clean the excess epoxy mixture that has squeezed out.<br />
9. Allow the epoxy to cure at least 24 hours before applying load to the hardware. Allow<br />
more time in cool weather.<br />
Bonding the contact surface of a hardware item can contribute a great deal to load<br />
distribution over maximum wood surface area. You can use <strong>WEST</strong> <strong>SYSTEM</strong> epoxy to<br />
make good bonds with most metals. However, careful preparation of the metal surface<br />
is necessary for good adhesion. This includes sanding and acid etching. For example,<br />
aluminum requires a two-step surface preparation. The first step involves the use of an<br />
acid conditioner that removes corrosion. The second step chemically stabilizes the<br />
surface and prevents oxidation, allowing time for coating or bonding. The <strong>WEST</strong><br />
<strong>SYSTEM</strong> 860 Aluminum Etch Kit contains complete instructions.<br />
6


