Wooden Boat Restoration Repair - WEST SYSTEM Epoxy
Wooden Boat Restoration Repair - WEST SYSTEM Epoxy
Wooden Boat Restoration Repair - WEST SYSTEM Epoxy
Create successful ePaper yourself
Turn your PDF publications into a flip-book with our unique Google optimized e-Paper software.
5.4.1 Laminating a curved patch in place<br />
Laminating a patch for repairing a molded panel combines two procedures already<br />
covered: repairing damaged plywood sections and laminating frames. Laminating a<br />
curved panel section in a large damaged area requires temporary backup stringers to<br />
act as a jig. Laminate the patch in place as follows:<br />
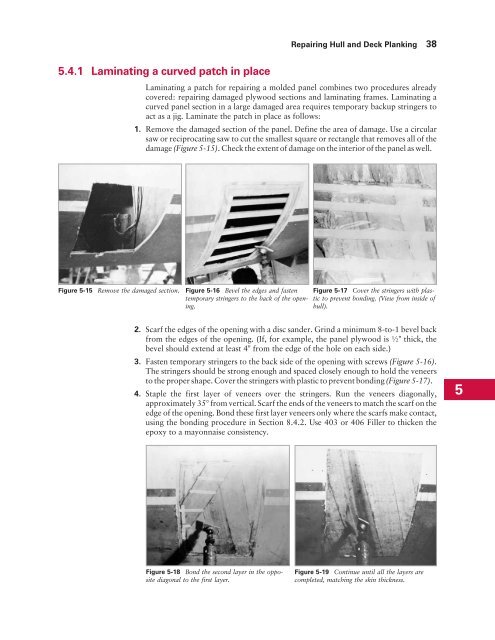
1. Remove the damaged section of the panel. Define the area of damage. Use a circular<br />
saw or reciprocating saw to cut the smallest square or rectangle that removes all of the<br />
damage (Figure 5-15). Check the extent of damage on the interior of the panel as well.<br />
Figure 5-15 Remove the damaged section. Figure 5-16 Bevel the edges and fasten<br />
temporary stringers to the back of the opening.<br />
<strong>Repair</strong>ing Hull and Deck Planking 38<br />
Figure 5-17 Cover the stringers with plastic<br />
to prevent bonding. (View from inside of<br />
hull).<br />
2. Scarf the edges of the opening with a disc sander. Grind a minimum 8-to-1 bevel back<br />
from the edges of the opening. (If, for example, the panel plywood is ½" thick, the<br />
bevel should extend at least 4" from the edge of the hole on each side.)<br />
3. Fasten temporary stringers to the back side of the opening with screws (Figure 5-16).<br />
The stringers should be strong enough and spaced closely enough to hold the veneers<br />
to the proper shape. Cover the stringers with plastic to prevent bonding (Figure 5-17).<br />
4. Staple the first layer of veneers over the stringers. Run the veneers diagonally,<br />
approximately 35° from vertical. Scarf the ends of the veneers to match the scarf on the<br />
edge of the opening. Bond these first layer veneers only where the scarfs make contact,<br />
using the bonding procedure in Section 8.4.2. Use 403 or 406 Filler to thicken the<br />
epoxy to a mayonnaise consistency.<br />
Figure 5-18 Bond the second layer in the opposite<br />
diagonal to the first layer.<br />
Figure 5-19 Continue until all the layers are<br />
completed, matching the skin thickness.<br />
5


