

Wooden Boat Restoration Repair - WEST SYSTEM Epoxy
Wooden Boat Restoration Repair - WEST SYSTEM Epoxy
Wooden Boat Restoration Repair - WEST SYSTEM Epoxy

You also want an ePaper? Increase the reach of your titles
YUMPU automatically turns print PDFs into web optimized ePapers that Google loves.
Mixing<br />
Stir the two ingredients together thoroughly, at least one minute—longer in cooler<br />
temperatures (Figure 8-5). To assure thorough mixing, scrape the sides and bottom of<br />
the pot as you mix. Use the flat end of the mixing stick to reach the inside corner of the<br />
pot. If you are using a power mixer, occasionally scrape the sides and corners of the<br />
mixing pot while mixing.<br />
If you are going to be using the mixture for coating, quickly pour it into a roller pan to<br />
extend the open time.<br />
WARNING! Curing epoxy generates heat. Do not fill or cast layers of epoxy thicker<br />
<br />
than ½"—thinner if enclosed by foam or other insulated material. Several inches of<br />
mixed epoxy in a plastic mixing cup can generate enough heat to melt the cup, burn<br />
your skin and ignite combustible materials if left to stand for its full pot life. For this<br />
reason, do not use foam or glass mixing containers. If a pot of mixed epoxy begins to<br />
exotherm (heat up), quickly move it outdoors. Avoid breathing the fumes. Do not dispose<br />
of the mixture until the reaction is complete and has cooled.<br />
8.3.4 Adding fillers and additives<br />
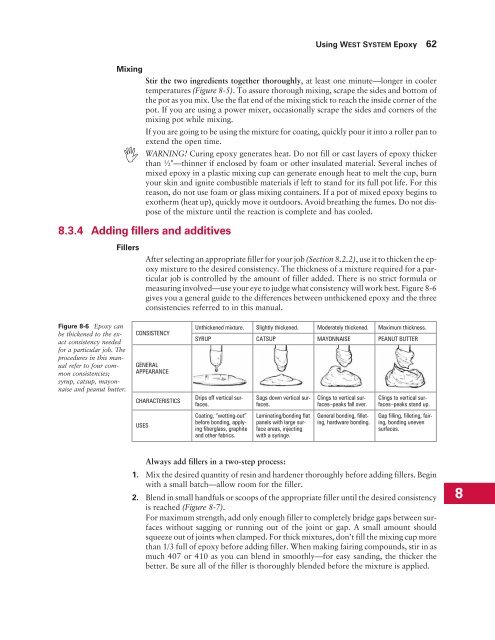
Figure 8-6 <strong>Epoxy</strong> can<br />
be thickened to the exact<br />
consistency needed<br />
for a particular job. The<br />
procedures in this manual<br />
refer to four common<br />
consistencies;<br />
syrup, catsup, mayonnaise<br />
and peanut butter.<br />
Fillers<br />
Using <strong>WEST</strong> <strong>SYSTEM</strong> <strong>Epoxy</strong> 62<br />
After selecting an appropriate filler for your job (Section 8.2.2), use it to thicken the epoxy<br />
mixture to the desired consistency. The thickness of a mixture required for a particular<br />
job is controlled by the amount of filler added. There is no strict formula or<br />
measuring involved—use your eye to judge what consistency will work best. Figure 8-6<br />
gives you a general guide to the differences between unthickened epoxy and the three<br />
consistencies referred to in this manual.<br />
CONSISTENCY<br />
GENERAL<br />
APPEARANCE<br />
CHARACTERISTICS<br />
USES<br />
Unthickened mixture. Slightly thickened. Moderately thickened. Maximum thickness.<br />
SYRUP CATSUP MAYONNAISE PEANUT BUTTER<br />
Drips off vertical surfaces.<br />
Coating, “wetting-out”<br />
before bonding, applying<br />
fiberglass, graphite<br />
and other fabrics.<br />
Sags down vertical surfaces.<br />
Laminating/bonding flat<br />
panels with large surface<br />
areas, injecting<br />
with a syringe.<br />
Clings to vertical surfaces–peaks<br />
fall over.<br />
General bonding, filleting,<br />
hardware bonding.<br />
Clings to vertical surfaces–peaks<br />
stand up.<br />
Gap filling, filleting, fairing,<br />
bonding uneven<br />
surfaces.<br />
Always add fillers in a two-step process:<br />
1. Mix the desired quantity of resin and hardener thoroughly before adding fillers. Begin<br />
with a small batch—allow room for the filler.<br />
2. Blend in small handfuls or scoops of the appropriate filler until the desired consistency<br />
is reached (Figure 8-7).<br />
For maximum strength, add only enough filler to completely bridge gaps between surfaces<br />
without sagging or running out of the joint or gap. A small amount should<br />
squeeze out of joints when clamped. For thick mixtures, don’t fill the mixing cup more<br />
than 1/3 full of epoxy before adding filler. When making fairing compounds, stir in as<br />
much 407 or 410 as you can blend in smoothly—for easy sanding, the thicker the<br />
better. Be sure all of the filler is thoroughly blended before the mixture is applied.<br />
8


