

Wooden Boat Restoration Repair - WEST SYSTEM Epoxy
Wooden Boat Restoration Repair - WEST SYSTEM Epoxy
Wooden Boat Restoration Repair - WEST SYSTEM Epoxy

Create successful ePaper yourself
Turn your PDF publications into a flip-book with our unique Google optimized e-Paper software.
8.4.3 Bonding with fillets<br />
Vacuum bagging is the ideal clamping method for laminating a wide range of materials.<br />
Through the use of a vacuum pump and plastic sheeting, the atmosphere is used to<br />
apply perfectly even clamping pressure over all areas of a panel regardless of the size,<br />
shape or number of layers. For detail information on vacuum bagging, refer to 002-150<br />
Vacuum Bagging Techniques.<br />
A fillet (fil’it) is a cove-shaped application of thickened epoxy that bridges an inside<br />
corner joint. It is excellent for bonding parts because it increases the surface area of the<br />
bond and serves as a structural brace. All joints that will be covered with fiberglass cloth<br />
will require a fillet to support the cloth at the inside corner of the joint.<br />
The procedure for bonding with fillets is the same as normal bonding except that<br />
instead of removing the squeezed-out thickened epoxy after the components are<br />
clamped in position, you shape it into a fillet. For larger fillets, add thickened mixture<br />
to the joint as soon as the bonding operation is complete, before the bonding mixture<br />
becomes tack free, or any time after the final cure and sanding of exposed epoxy in the<br />
fillet area.<br />
1. Bond parts as described in 8.4.2 Bonding.<br />
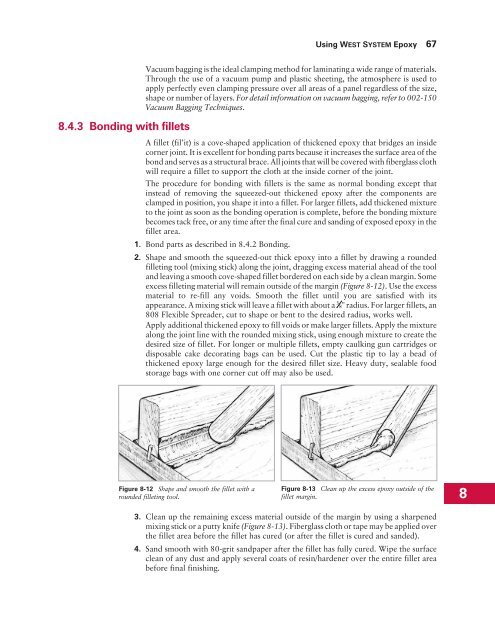
2. Shape and smooth the squeezed-out thick epoxy into a fillet by drawing a rounded<br />
filleting tool (mixing stick) along the joint, dragging excess material ahead of the tool<br />
and leaving a smooth cove-shaped fillet bordered on each side by a clean margin. Some<br />
excess filleting material will remain outside of the margin (Figure 8-12). Use the excess<br />
material to re-fill any voids. Smooth the fillet until you are satisfied with its<br />
appearance. A mixing stick will leave a fillet with about a 3 8" radius. For larger fillets, an<br />
808 Flexible Spreader, cut to shape or bent to the desired radius, works well.<br />
Apply additional thickened epoxy to fill voids or make larger fillets. Apply the mixture<br />
along the joint line with the rounded mixing stick, using enough mixture to create the<br />
desired size of fillet. For longer or multiple fillets, empty caulking gun cartridges or<br />
disposable cake decorating bags can be used. Cut the plastic tip to lay a bead of<br />
thickened epoxy large enough for the desired fillet size. Heavy duty, sealable food<br />
storage bags with one corner cut off may also be used.<br />
Figure 8-12 Shape and smooth the fillet with a<br />
rounded filleting tool.<br />
Using <strong>WEST</strong> <strong>SYSTEM</strong> <strong>Epoxy</strong> 67<br />
Figure 8-13 Clean up the excess epoxy outside of the<br />
fillet margin. 8<br />
3. Clean up the remaining excess material outside of the margin by using a sharpened<br />
mixing stick or a putty knife (Figure 8-13). Fiberglass cloth or tape may be applied over<br />
the fillet area before the fillet has cured (or after the fillet is cured and sanded).<br />
4. Sand smooth with 80-grit sandpaper after the fillet has fully cured. Wipe the surface<br />
clean of any dust and apply several coats of resin/hardener over the entire fillet area<br />
before final finishing.


