

Wooden Boat Restoration Repair - WEST SYSTEM Epoxy
Wooden Boat Restoration Repair - WEST SYSTEM Epoxy
Wooden Boat Restoration Repair - WEST SYSTEM Epoxy

Create successful ePaper yourself
Turn your PDF publications into a flip-book with our unique Google optimized e-Paper software.
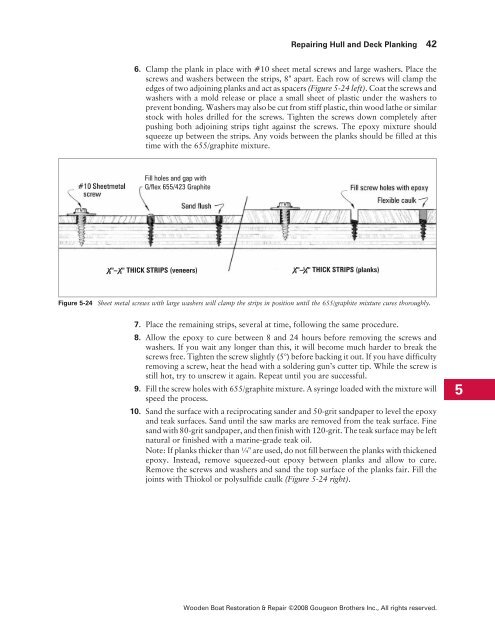
6. Clamp the plank in place with #10 sheet metal screws and large washers. Place the<br />
screws and washers between the strips, 8" apart. Each row of screws will clamp the<br />
edges of two adjoining planks and act as spacers (Figure 5-24 left). Coat the screws and<br />
washers with a mold release or place a small sheet of plastic under the washers to<br />
prevent bonding. Washers may also be cut from stiff plastic, thin wood lathe or similar<br />
stock with holes drilled for the screws. Tighten the screws down completely after<br />
pushing both adjoining strips tight against the screws. The epoxy mixture should<br />
squeeze up between the strips. Any voids between the planks should be filled at this<br />
time with the 655/graphite mixture.<br />
Fill holes and gap with<br />
G/flex 655/423 Graphite<br />
1 8"– 1 4" THICK STRIPS (veneers)<br />
<strong>Repair</strong>ing Hull and Deck Planking 42<br />
1 4"– 3 4" THICK STRIPS (planks)<br />
Figure 5-24 Sheet metal screws with large washers will clamp the strips in position until the 655/graphite mixture cures thoroughly.<br />
7. Place the remaining strips, several at time, following the same procedure.<br />
8. Allow the epoxy to cure between 8 and 24 hours before removing the screws and<br />
washers. If you wait any longer than this, it will become much harder to break the<br />
screws free. Tighten the screw slightly (5°) before backing it out. If you have difficulty<br />
removing a screw, heat the head with a soldering gun’s cutter tip. While the screw is<br />
still hot, try to unscrew it again. Repeat until you are successful.<br />
9. Fill the screw holes with 655/graphite mixture. A syringe loaded with the mixture will<br />
speed the process.<br />
10. Sand the surface with a reciprocating sander and 50-grit sandpaper to level the epoxy<br />
and teak surfaces. Sand until the saw marks are removed from the teak surface. Fine<br />
sand with 80-grit sandpaper, and then finish with 120-grit. The teak surface may be left<br />
natural or finished with a marine-grade teak oil.<br />
Note: If planks thicker than ¼" are used, do not fill between the planks with thickened<br />
epoxy. Instead, remove squeezed-out epoxy between planks and allow to cure.<br />
Remove the screws and washers and sand the top surface of the planks fair. Fill the<br />
joints with Thiokol or polysulfide caulk (Figure 5-24 right).<br />
<strong>Wooden</strong> <strong>Boat</strong> <strong>Restoration</strong> & <strong>Repair</strong> ©2008 Gougeon Brothers Inc., All rights reserved.<br />
5


