Volume-II - GAIL
Volume-II - GAIL
Volume-II - GAIL
You also want an ePaper? Increase the reach of your titles
YUMPU automatically turns print PDFs into web optimized ePapers that Google loves.
9.8.5.1.1<br />
(New)<br />
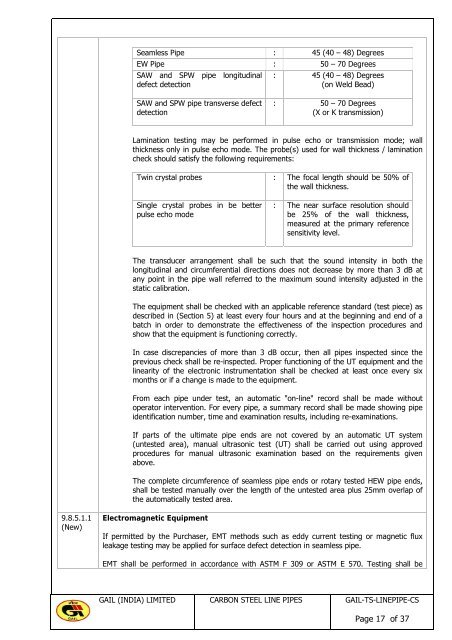
Seamless Pipe : 45 (40 – 48) Degrees<br />
EW Pipe : 50 – 70 Degrees<br />
SAW and SPW pipe longitudinal<br />
defect detection<br />
SAW and SPW pipe transverse defect<br />
detection<br />
: 45 (40 – 48) Degrees<br />
(on Weld Bead)<br />
: 50 – 70 Degrees<br />
(X or K transmission)<br />
Lamination testing may be performed in pulse echo or transmission mode; wall<br />
thickness only in pulse echo mode. The probe(s) used for wall thickness / lamination<br />
check should satisfy the following requirements:<br />
Twin crystal probes<br />
Single crystal probes in be better<br />
pulse echo mode<br />
: The focal length should be 50% of<br />
the wall thickness.<br />
: The near surface resolution should<br />
be 25% of the wall thickness,<br />
measured at the primary reference<br />
sensitivity level.<br />
The transducer arrangement shall be such that the sound intensity in both the<br />
longitudinal and circumferential directions does not decrease by more than 3 dB at<br />
any point in the pipe wall referred to the maximum sound intensity adjusted in the<br />
static calibration.<br />
The equipment shall be checked with an applicable reference standard (test piece) as<br />
described in (Section 5) at least every four hours and at the beginning and end of a<br />
batch in order to demonstrate the effectiveness of the inspection procedures and<br />
show that the equipment is functioning correctly.<br />
In case discrepancies of more than 3 dB occur, then all pipes inspected since the<br />
previous check shall be re-inspected. Proper functioning of the UT equipment and the<br />
linearity of the electronic instrumentation shall be checked at least once every six<br />
months or if a change is made to the equipment.<br />
From each pipe under test, an automatic "on-line" record shall be made without<br />
operator intervention. For every pipe, a summary record shall be made showing pipe<br />
identification number, time and examination results, including re-examinations.<br />
If parts of the ultimate pipe ends are not covered by an automatic UT system<br />
(untested area), manual ultrasonic test (UT) shall be carried out using approved<br />
procedures for manual ultrasonic examination based on the requirements given<br />
above.<br />
The complete circumference of seamless pipe ends or rotary tested HEW pipe ends,<br />
shall be tested manually over the length of the untested area plus 25mm overlap of<br />
the automatically tested area.<br />
Electromagnetic Equipment<br />
If permitted by the Purchaser, EMT methods such as eddy current testing or magnetic flux<br />
leakage testing may be applied for surface defect detection in seamless pipe.<br />
EMT shall be performed in accordance with ASTM F 309 or ASTM E 570. Testing shall be<br />
<strong>GAIL</strong> (INDIA) LIMITED CARBON STEEL LINE PIPES <strong>GAIL</strong>-TS-LINEPIPE-CS<br />
Page 17 of 37


