Service Manual, General Motors 4.3L Engine (TP ... - Kohler Power
Service Manual, General Motors 4.3L Engine (TP ... - Kohler Power
Service Manual, General Motors 4.3L Engine (TP ... - Kohler Power

Create successful ePaper yourself
Turn your PDF publications into a flip-book with our unique Google optimized e-Paper software.
<strong>Engine</strong> Marine/Industrial <strong>4.3L</strong> 6-93<br />
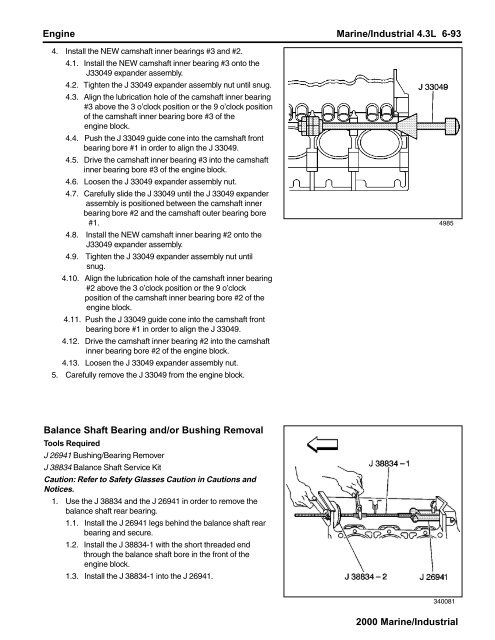
4. Install the NEW camshaft inner bearings #3 and #2.<br />
4.1. Install the NEW camshaft inner bearing #3 onto the<br />
J33049 expander assembly.<br />
4.2. Tighten the J 33049 expander assembly nut until snug.<br />
4.3. Align the lubrication hole of the camshaft inner bearing<br />
#3 above the 3 o’clock position or the 9 o’clock position<br />
of the camshaft inner bearing bore #3 of the<br />
engine block.<br />
4.4. Push the J 33049 guide cone into the camshaft front<br />
bearing bore #1 in order to align the J 33049.<br />
4.5. Drive the camshaft inner bearing #3 into the camshaft<br />
inner bearing bore #3 of the engine block.<br />
4.6. Loosen the J 33049 expander assembly nut.<br />
4.7. Carefully slide the J 33049 until the J 33049 expander<br />
assembly is positioned between the camshaft inner<br />
bearing bore #2 and the camshaft outer bearing bore<br />
#1.<br />
4.8. Install the NEW camshaft inner bearing #2 onto the<br />
J33049 expander assembly.<br />
4.9. Tighten the J 33049 expander assembly nut until<br />
snug.<br />
4.10. Align the lubrication hole of the camshaft inner bearing<br />
#2 above the 3 o’clock position or the 9 o’clock<br />
position of the camshaft inner bearing bore #2 of the<br />
engine block.<br />
4.11. Push the J 33049 guide cone into the camshaft front<br />
bearing bore #1 in order to align the J 33049.<br />
4.12. Drive the camshaft inner bearing #2 into the camshaft<br />
inner bearing bore #2 of the engine block.<br />
4.13. Loosen the J 33049 expander assembly nut.<br />
5. Carefully remove the J 33049 from the engine block.<br />
4985<br />
Balance Shaft Bearing and/or Bushing Removal<br />
Tools Required<br />
J 26941 Bushing/Bearing Remover<br />
J 38834 Balance Shaft <strong>Service</strong> Kit<br />
Caution: Refer to Safety Glasses Caution in Cautions and<br />
Notices.<br />
1. Use the J 38834 and the J 26941 in order to remove the<br />
balance shaft rear bearing.<br />
1.1. Install the J 26941 legs behind the balance shaft rear<br />
bearing and secure.<br />
1.2. Install the J 38834-1 with the short threaded end<br />
through the balance shaft bore in the front of the<br />
engine block.<br />
1.3. Install the J 38834-1 into the J 26941.<br />
340081<br />
2000 Marine/Industrial