Service Manual, General Motors 4.3L Engine (TP ... - Kohler Power
Service Manual, General Motors 4.3L Engine (TP ... - Kohler Power
Service Manual, General Motors 4.3L Engine (TP ... - Kohler Power

You also want an ePaper? Increase the reach of your titles
YUMPU automatically turns print PDFs into web optimized ePapers that Google loves.
6-144 Marine/Industrial <strong>4.3L</strong> <strong>Engine</strong><br />
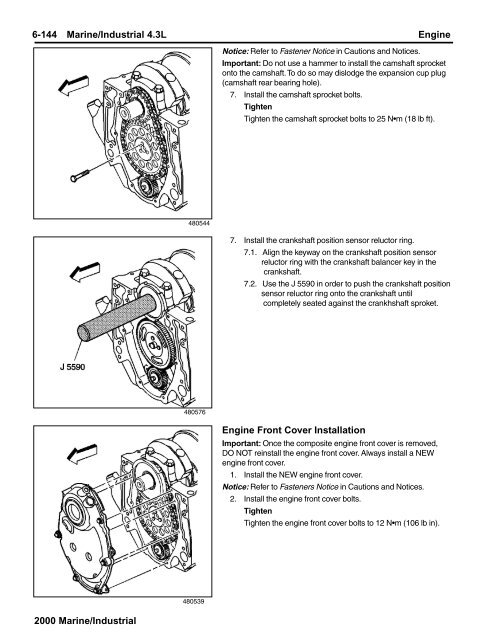
Notice: Refer to Fastener Notice in Cautions and Notices.<br />
Important: Do not use a hammer to install the camshaft sprocket<br />
onto the camshaft. To do so may dislodge the expansion cup plug<br />
(camshaft rear bearing hole).<br />
7. Install the camshaft sprocket bolts.<br />
Tighten<br />
Tighten the camshaft sprocket bolts to 25 N•m (18 lb ft).<br />
480544<br />
7. Install the crankshaft position sensor reluctor ring.<br />
7.1. Align the keyway on the crankshaft position sensor<br />
reluctor ring with the crankshaft balancer key in the<br />
crankshaft.<br />
7.2. Use the J 5590 in order to push the crankshaft position<br />
sensor reluctor ring onto the crankshaft until<br />
completely seated against the crankhshaft sproket.<br />
480576<br />
<strong>Engine</strong> Front Cover Installation<br />
Important: Once the composite engine front cover is removed,<br />
DO NOT reinstall the engine front cover. Always install a NEW<br />
engine front cover.<br />
1. Install the NEW engine front cover.<br />
Notice: Refer to Fasteners Notice in Cautions and Notices.<br />
2. Install the engine front cover bolts.<br />
Tighten<br />
Tighten the engine front cover bolts to 12 N•m (106 lb in).<br />
2000 Marine/Industrial<br />
480539