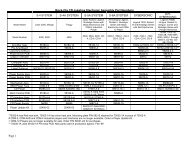
warning!
warning!
warning!

Create successful ePaper yourself
Turn your PDF publications into a flip-book with our unique Google optimized e-Paper software.
13. ACCELERATOR & BRAKE<br />
WARNING!<br />
Before starting to work, ensure that the Power SW is OFF. Failure to observe<br />
this can cause electric shock or short circuit.<br />
Use care so as not to damage wirings. Damaged wiring can cause electric<br />
shock or short circuit.<br />
Do not touch undesignated places. Touching places not designated can cause<br />
electric shock or short circuit.<br />
This work should be performed by the Location's Maintenance Man or<br />
Serviceman. Performing work by non-technical personnel can cause electric<br />
shock hazard.<br />
When performing work such as parts replacement other than those specified<br />
in this manual, be sure to contact where you purchased the product<br />
from. Confirm the work procedures and obtain precautions from where<br />
you purchased the product prior to performing work. Inappropriate parts<br />
replacement and/or installation with erroneous adjustment can cause an<br />
overload or the parts to come into contact, resulting in an electric shock, a<br />
short circuit, and a fire.<br />
STOP<br />
IMPORTANT!<br />
Be sure to perform volume's move value setting in the Volume Setting in the Test<br />
Mode after replacing or adjusting the Volume. (See 10-3E.)<br />
If Accel. and Brake operation is not satisfactory, adjustment of volume installation position or<br />
volume replacement is needed. Also, be sure to apply greasing to the gear mesh portion once<br />
every 3 months.<br />
13-1 ADJUSTING OR REPLACING THE VOLUME<br />
The following tools are required for the operations below: Phillips screwdrivers for M4 and M5.<br />
The appropriate value for both ACCEL. Volume and Brake Volume is under 30H when released<br />
and over C0H when stepped on. Check Volume values in the TEST mode. Since work is<br />
performed inside the energized cabinet, be very careful so as not to touch undesignated places.<br />
Touching places not specified can cause electric shock or short circuit.<br />
ADJUSTING PROCEDURE<br />
TRUSS SCREW(2),chrome<br />
M4×8<br />
Take out the 2 truss screws and<br />
remove the Front Cover from the<br />
Accel. & Brake Unit (FIG. 13. 1 a).<br />
FIG. 13. 1 a<br />
FRONT COVER<br />
www.seuservice.com<br />
68