warning!
warning!
warning!

Create successful ePaper yourself
Turn your PDF publications into a flip-book with our unique Google optimized e-Paper software.
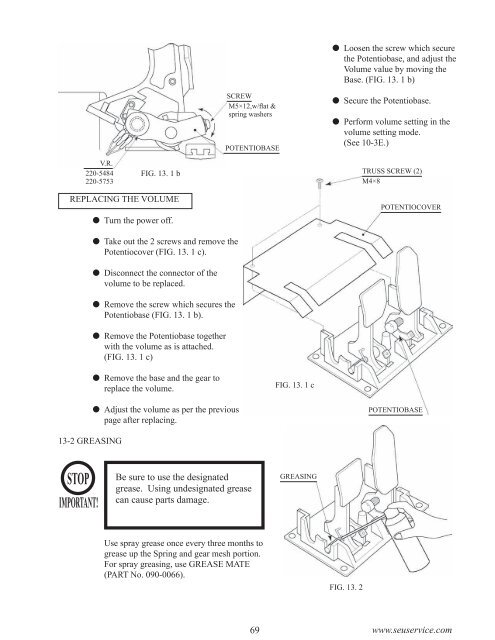
Loosen the screw which secure<br />
the Potentiobase, and adjust the<br />
Volume value by moving the<br />
Base. (FIG. 13. 1 b)<br />
SCREW<br />
M5×12,w/flat &<br />
spring washers<br />
POTENTIOBASE<br />
Secure the Potentiobase.<br />
Perform volume setting in the<br />
volume setting mode.<br />
(See 10-3E.)<br />
V.R.<br />
220-5484<br />
220-5753<br />
FIG. 13. 1 b<br />
TRUSS SCREW (2)<br />
M4×8<br />
REPLACING THE VOLUME<br />
Turn the power off.<br />
POTENTIOCOVER<br />
Take out the 2 screws and remove the<br />
Potentiocover (FIG. 13. 1 c).<br />
Disconnect the connector of the<br />
volume to be replaced.<br />
Remove the screw which secures the<br />
Potentiobase (FIG. 13. 1 b).<br />
Remove the Potentiobase together<br />
with the volume as is attached.<br />
(FIG. 13. 1 c)<br />
Remove the base and the gear to<br />
replace the volume.<br />
FIG. 13. 1 c<br />
Adjust the volume as per the previous<br />
page after replacing.<br />
POTENTIOBASE<br />
13-2 GREASING<br />
STOP<br />
IMPORTANT!<br />
Be sure to use the designated<br />
grease. Using undesignated grease<br />
can cause parts damage.<br />
GREASING<br />
Use spray grease once every three months to<br />
grease up the Spring and gear mesh portion.<br />
For spray greasing, use GREASE MATE<br />
(PART No. 090-0066).<br />
FIG. 13. 2<br />
69 www.seuservice.com