SENTROL Application notes - Alarms BC
SENTROL Application notes - Alarms BC
SENTROL Application notes - Alarms BC

You also want an ePaper? Increase the reach of your titles
YUMPU automatically turns print PDFs into web optimized ePapers that Google loves.
.........................................................................................................................................................................<br />
Residential & Commercial <strong>Application</strong>s<br />
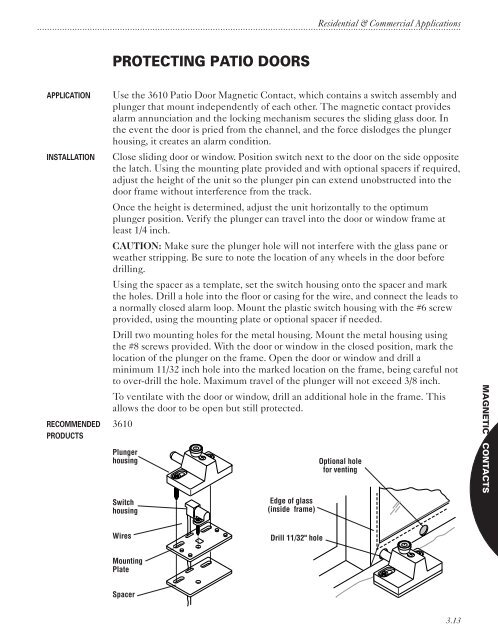
PROTECTING PATIO DOORS<br />
APPLICATION<br />
INSTALLATION<br />
RECOMMENDED<br />
PRODUCTS<br />
Use the 3610 Patio Door Magnetic Contact, which contains a switch assembly and<br />
plunger that mount independently of each other. The magnetic contact provides<br />
alarm annunciation and the locking mechanism secures the sliding glass door. In<br />
the event the door is pried from the channel, and the force dislodges the plunger<br />
housing, it creates an alarm condition.<br />
Close sliding door or window. Position switch next to the door on the side opposite<br />
the latch. Using the mounting plate provided and with optional spacers if required,<br />
adjust the height of the unit so the plunger pin can extend unobstructed into the<br />
door frame without interference from the track.<br />
Once the height is determined, adjust the unit horizontally to the optimum<br />
plunger position. Verify the plunger can travel into the door or window frame at<br />
least 1/4 inch.<br />
CAUTION: Make sure the plunger hole will not interfere with the glass pane or<br />
weather stripping. Be sure to note the location of any wheels in the door before<br />
drilling.<br />
Using the spacer as a template, set the switch housing onto the spacer and mark<br />
the holes. Drill a hole into the floor or casing for the wire, and connect the leads to<br />
a normally closed alarm loop. Mount the plastic switch housing with the #6 screw<br />
provided, using the mounting plate or optional spacer if needed.<br />
Drill two mounting holes for the metal housing. Mount the metal housing using<br />
the #8 screws provided. With the door or window in the closed position, mark the<br />
location of the plunger on the frame. Open the door or window and drill a<br />
minimum 11/32 inch hole into the marked location on the frame, being careful not<br />
to over-drill the hole. Maximum travel of the plunger will not exceed 3/8 inch.<br />
To ventilate with the door or window, drill an additional hole in the frame. This<br />
allows the door to be open but still protected.<br />
3610<br />
Plunger<br />
housing<br />
Switch<br />
housing<br />
Edge of glass<br />
(inside frame)<br />
Optional hole<br />
for venting<br />
MAGNETIC CONTACTS<br />
Wires<br />
Drill 11/32" hole<br />
Mounting<br />
Plate<br />
Spacer<br />
3.13