Unit A Reproduction
Unit A Reproduction
Unit A Reproduction

Create successful ePaper yourself
Turn your PDF publications into a flip-book with our unique Google optimized e-Paper software.
3B<br />
Investigation<br />
Examining Seeds<br />
Recall, from Grade 8 science, that the chloroplasts in<br />
the leaves of a plant produce starch. This starch is<br />
used by the plant as a food supply. Where does a seed<br />
get the energy to grow the first shoots and leaves?<br />
Seeds are part of the diet of a variety of animals,<br />
including humans. Starch is one molecule that is<br />
produced by plants that animals eat. Iodine is a<br />
chemical that turns a blue-black colour when starch<br />
is present.<br />
Question<br />
Does a plant seed contain other components, in<br />
addition to the embryo?<br />
Prediction<br />
Write a prediction about what you will find inside<br />
plant seeds.<br />
Experimental Design<br />
In this investigation, you will examine bean and corn<br />
seeds and identify the structures of the embryo. You<br />
will also identify structures that may contain starch, a<br />
common plant food molecule. You will test the seeds<br />
with iodine to determine the presence of starch.<br />
Materials<br />
• safety goggles<br />
• disposable gloves<br />
• apron<br />
• dry lima-bean seeds<br />
• dissecting needle<br />
• magnifier (lens or loupe) or dissecting microscope<br />
• pipette<br />
• iodine solution<br />
• corn seeds soaked in water for 24 h<br />
• forceps<br />
• scalpel<br />
INQUIRY SKILLS<br />
Questioning<br />
Hypothesizing<br />
Predicting<br />
Planning<br />
Procedure<br />
Conducting<br />
Recording<br />
Analyzing<br />
Evaluating<br />
Synthesizing<br />
Communicating<br />
Exercise care and caution when using sharp dissecting<br />
needles and scalpels.<br />
Wear your safety goggles, gloves, and apron throughout<br />
this investigation. Iodine irritates eyes and skin, and<br />
may stain clothing.<br />
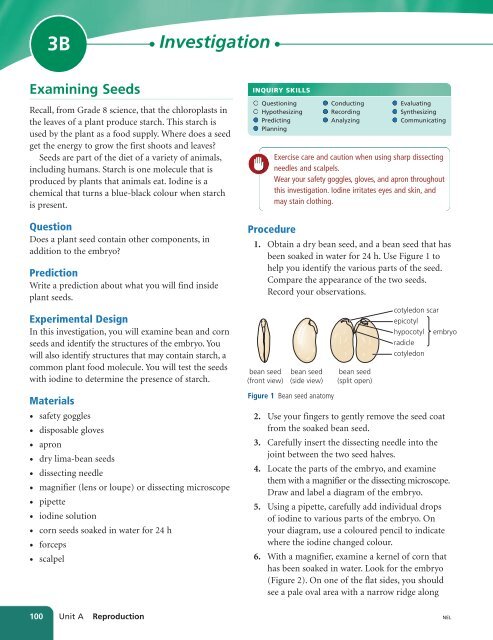
1. Obtain a dry bean seed, and a bean seed that has<br />
been soaked in water for 24 h. Use Figure 1 to<br />
help you identify the various parts of the seed.<br />
Compare the appearance of the two seeds.<br />
Record your observations.<br />
bean seed<br />
(front view)<br />
bean seed<br />
(side view)<br />
Figure 1 Bean seed anatomy<br />
bean seed<br />
(split open)<br />
cotyledon scar<br />
epicotyl<br />
hypocotyl<br />
radicle<br />
cotyledon<br />
embryo<br />
2. Use your fingers to gently remove the seed coat<br />
from the soaked bean seed.<br />
3. Carefully insert the dissecting needle into the<br />
joint between the two seed halves.<br />
4. Locate the parts of the embryo, and examine<br />
them with a magnifier or the dissecting microscope.<br />
Draw and label a diagram of the embryo.<br />
5. Using a pipette, carefully add individual drops<br />
of iodine to various parts of the embryo. On<br />
your diagram, use a coloured pencil to indicate<br />
where the iodine changed colour.<br />
6. With a magnifier, examine a kernel of corn that<br />
has been soaked in water. Look for the embryo<br />
(Figure 2). On one of the flat sides, you should<br />
see a pale oval area with a narrow ridge along<br />
100 <strong>Unit</strong> A <strong>Reproduction</strong><br />
NEL