- Page 2 and 3: Get Started with SURFCAM Copyright
- Page 4 and 5: Step 1: Face the material .........
- Page 6 and 7: System Requirements The following o
- Page 8 and 9: SURFCAM Help SURFCAM provides onlin
- Page 10 and 11: toolbars. If you select No Text Lab
- Page 12 and 13: The SURFCAM Status Toolbar The butt
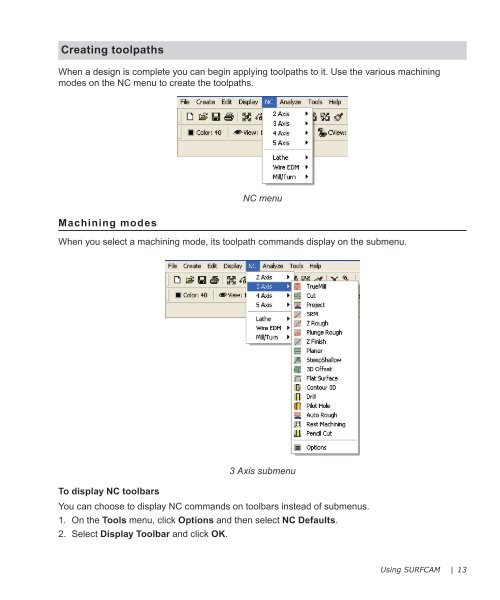
- Page 14 and 15: Using SURFCAM SURFCAM is a computer
- Page 18 and 19: To activate the change, you need to
- Page 20 and 21: Managing toolpaths Use the NC Opera
- Page 22 and 23: Generating NC code A CNC machine to
- Page 24 and 25: Creating and modifying geometry in
- Page 26 and 27: Icon Command Description Sketch Poi
- Page 28 and 29: Step 1: Draw the part profile The f
- Page 30 and 31: 5 Click Keyboard 6 Enter 0.0 for al
- Page 32 and 33: 4 Select the bottom line 5 Click in
- Page 34 and 35: Trim and fillet the corners of the
- Page 36 and 37: 7 Click the Trim button until Trim
- Page 38 and 39: 5 Select the beginning element as s
- Page 40 and 41: 2 Click Center/Diameter 3 Enter a d
- Page 42 and 43: 2 Click Offset 3 Click Change Offse
- Page 44 and 45: 9 Click inside the profile to indic
- Page 46 and 47: 2 Click Tangent 2 3 Click Change Ra
- Page 48 and 49: 9 Select the lower half of the larg
- Page 50 and 51: 14 Click Change Radius 15 Change th
- Page 52 and 53: 4 Click Center 5 Select the circle
- Page 54 and 55: 4 Click Sketch 5 Select the origin
- Page 56 and 57: You have now completed drawing the
- Page 58 and 59: 4 Click Keyboard 5 Set the dialog a
- Page 60 and 61: Now you need to specify two locatio
- Page 62 and 63: 9 Click Fit This project is now com
- Page 64 and 65: SURFCAM 2 Axis Milling SURFCAM’s
- Page 66 and 67:
Icon Command Description Material P
- Page 68 and 69:
Before you begin Make sure your uni
- Page 70 and 71:
By default, Chain is selected on th
- Page 72 and 73:
6 Enter 1 for the Tool Number and L
- Page 74 and 75:
11 Click Accept 12 On the Main tool
- Page 76 and 77:
4 Click Part 6 Click Auto 5 Select
- Page 78 and 79:
11 Click the Cut Control tab 12 Set
- Page 80 and 81:
Step 3: Drill the holes A single dr
- Page 82 and 83:
4 Select one of the drilled holes i
- Page 84 and 85:
4 Click Select Tool 5 Select the .5
- Page 86 and 87:
11 Click Add After 12 Click Select
- Page 88 and 89:
16 Click the Cycle Control tab 17 S
- Page 90 and 91:
24 Click the Sorting Control tab 25
- Page 92 and 93:
Step 4: Chamfer the edges Chamferin
- Page 94 and 95:
5 Click the Cut Control tab 6 Enter
- Page 96 and 97:
Step 5: Verify the tool path Verifi
- Page 98 and 99:
8 Click Run SURFCAM Verify The Veri
- Page 100 and 101:
13 Click Play to start the verifica
- Page 102 and 103:
3 Set the dialog as shown and click
- Page 104 and 105:
Now the generated code is shown in
- Page 106 and 107:
Creating and modifying surfaces in
- Page 108 and 109:
For this project you will learn how
- Page 110 and 111:
Next you will create a fillet surfa
- Page 112 and 113:
12 Click Fillet 13 Change Fillet Ra
- Page 114 and 115:
4 Click End Point 5 Select the end
- Page 116 and 117:
Step 3: Add the cover Next you will
- Page 118 and 119:
You will finish the cover by creati
- Page 120 and 121:
5 Select the cover surface and the
- Page 122 and 123:
4 On the Edit menu, click Trim/Brea
- Page 124 and 125:
10 On the Create menu, click Surfac
- Page 126 and 127:
15 Click Yes to create the blend su
- Page 128 and 129:
22 Click End Point 23 Select the en
- Page 130 and 131:
SURFCAM 3 Axis Milling SURFCAM gene
- Page 132 and 133:
Step 1: Rough Surfaces Z Rough remo
- Page 134 and 135:
8 Set the Cut Control tab as shown
- Page 136 and 137:
12 Open the Operations Manager and
- Page 138 and 139:
3 Click Select Tool and choose the
- Page 140 and 141:
7 Click Sketch 8 Right-click on the
- Page 142 and 143:
Step 3: Finish the lens housing You
- Page 144 and 145:
4 Set the Cut Control tab as shown
- Page 146 and 147:
Step 4: Trace the blend fillets You
- Page 148 and 149:
5 Set the Cut Control tab as shown
- Page 150 and 151:
Next you will create stock for veri
- Page 152 and 153:
7 Click Run SURFCAM Verify Note: To