Manual - Gefen
Manual - Gefen
Manual - Gefen

Create successful ePaper yourself
Turn your PDF publications into a flip-book with our unique Google optimized e-Paper software.
Advanced Operation<br />
RS-232 and IP Configuration<br />
IP / UDP Configuration<br />
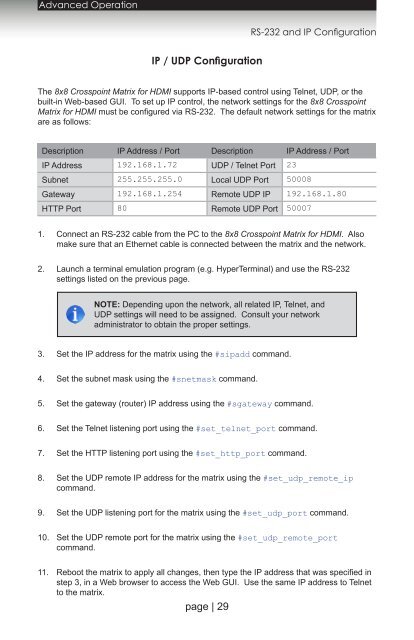
The 8x8 Crosspoint Matrix for HDMI supports IP-based control using Telnet, UDP, or the<br />
built-in Web-based GUI. To set up IP control, the network settings for the 8x8 Crosspoint<br />
Matrix for HDMI must be configured via RS-232. The default network settings for the matrix<br />
are as follows:<br />
Description IP Address / Port Description IP Address / Port<br />
IP Address 192.168.1.72 UDP / Telnet Port 23<br />
Subnet 255.255.255.0 Local UDP Port 50008<br />
Gateway 192.168.1.254 Remote UDP IP 192.168.1.80<br />
HTTP Port 80 Remote UDP Port 50007<br />
1. Connect an RS-232 cable from the PC to the 8x8 Crosspoint Matrix for HDMI. Also<br />
make sure that an Ethernet cable is connected between the matrix and the network.<br />
2. Launch a terminal emulation program (e.g. HyperTerminal) and use the RS-232<br />
settings listed on the previous page.<br />
NOTE: Depending upon the network, all related IP, Telnet, and<br />
UDP settings will need to be assigned. Consult your network<br />
administrator to obtain the proper settings.<br />
3. Set the IP address for the matrix using the #sipadd command.<br />
4. Set the subnet mask using the #snetmask command.<br />
5. Set the gateway (router) IP address using the #sgateway command.<br />
6. Set the Telnet listening port using the #set_telnet_port command.<br />
7. Set the HTTP listening port using the #set_http_port command.<br />
8. Set the UDP remote IP address for the matrix using the #set_udp_remote_ip<br />
command.<br />
9. Set the UDP listening port for the matrix using the #set_udp_port command.<br />
10. Set the UDP remote port for the matrix using the #set_udp_remote_port<br />
command.<br />
11. Reboot the matrix to apply all changes, then type the IP address that was specified in<br />
step 3, in a Web browser to access the Web GUI. Use the same IP address to Telnet<br />
to the matrix.<br />
page | 29