You also want an ePaper? Increase the reach of your titles
YUMPU automatically turns print PDFs into web optimized ePapers that Google loves.
8<br />
Customizing the settings/functions of your camera<br />
SLEEP<br />
After a specified period of time elapses with no operations being performed, the<br />
camera enters the sleep mode (stand-by) to save battery power. SLEEP lets you<br />
select sleep timer. OFF cancels the sleep mode.<br />
The camera activates again as soon as you touch any button (the shutter button,<br />
arrow pad etc.)<br />
Available modes<br />
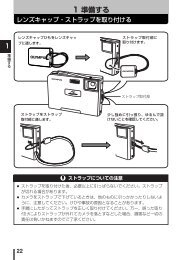
1<br />
Menu T 2 T SLEEP T OFF, 1min,<br />
3min, 5min, 10min<br />
~ “How to use the menus” (P. 25)<br />
2 Press the OK button.<br />
PC MODE<br />
132<br />
P A S M SCENE<br />
MENU<br />
OK button<br />
You can connect the camera directly to a computer or printer with the provided<br />
USB cable. If you specify the device you are connecting to beforehand, you can<br />
skip the USB connection setting procedure normally required every time you<br />
connect the cable to the camera. For details on how to connect the camera to<br />
either device, refer to Chapter 9 “Printing” (~ P. 137) and Chapter 10<br />
“Connecting the camera to a computer” (~ P. 163).<br />
AUTO : You are required to select PC or PRINT in the USB connection menu<br />
every time you connect the cable to a computer or printer.<br />
STORAGE : Allows USB connection to a PC and transfer of data to the PC. Also,<br />
select to use the OLYMPUS master software via PC connection.<br />
CONTROL : Allows you to control the camera from a PC using the optional<br />
OLYMPUS Studio.<br />
PRINT : Allows you to connect the camera to a PictBridge-compatible printer.<br />
Pictures can be printed directly without using a PC. ~ “Connecting<br />
the camera to a printer” (P. 147)