
You also want an ePaper? Increase the reach of your titles
YUMPU automatically turns print PDFs into web optimized ePapers that Google loves.
3<br />
Selecting the right mode for shooting conditions<br />
Selecting the right mode for the shooting technique — P, A, S and M<br />
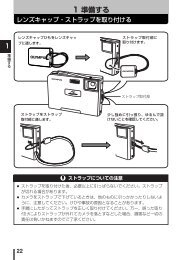
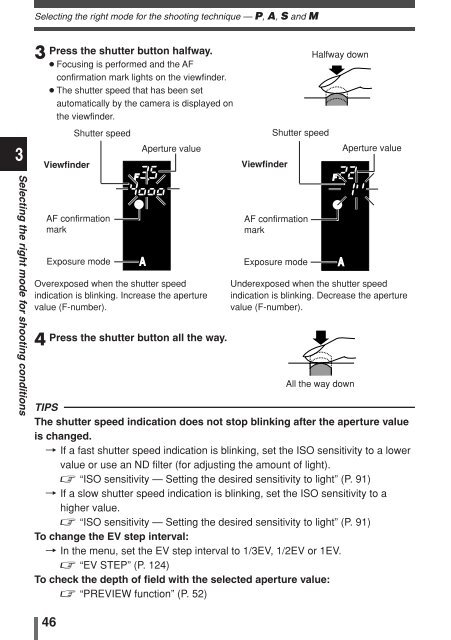
3 Press the shutter button halfway.<br />
● Focusing is performed and the AF<br />
confirmation mark lights on the viewfinder.<br />
● The shutter speed that has been set<br />
automatically by the camera is displayed on<br />
the viewfinder.<br />
Viewfinder<br />
Overexposed when the shutter speed<br />
indication is blinking. Increase the aperture<br />
value (F-number).<br />
46<br />
Shutter speed<br />
AF confirmation<br />
mark<br />
Exposure mode<br />
Aperture value<br />
4 Press the shutter button all the way.<br />
Viewfinder<br />
Shutter speed<br />
AF confirmation<br />
mark<br />
Exposure mode<br />
Halfway down<br />
Aperture value<br />
Underexposed when the shutter speed<br />
indication is blinking. Decrease the aperture<br />
value (F-number).<br />
All the way down<br />
TIPS<br />
The shutter speed indication does not stop blinking after the aperture value<br />
is changed.<br />
T If a fast shutter speed indication is blinking, set the ISO sensitivity to a lower<br />
value or use an ND filter (for adjusting the amount of light).<br />
~ “ISO sensitivity — Setting the desired sensitivity to light” (P. 91)<br />
T If a slow shutter speed indication is blinking, set the ISO sensitivity to a<br />
higher value.<br />
~ “ISO sensitivity — Setting the desired sensitivity to light” (P. 91)<br />
To change the EV step interval:<br />
T In the menu, set the EV step interval to 1/3EV, 1/2EV or 1EV.<br />
~ “EV STEP” (P. 124)<br />
To check the depth of field with the selected aperture value:<br />
~ “PREVIEW function” (P. 52)